Scheduling and Selecting Users for a Checklist
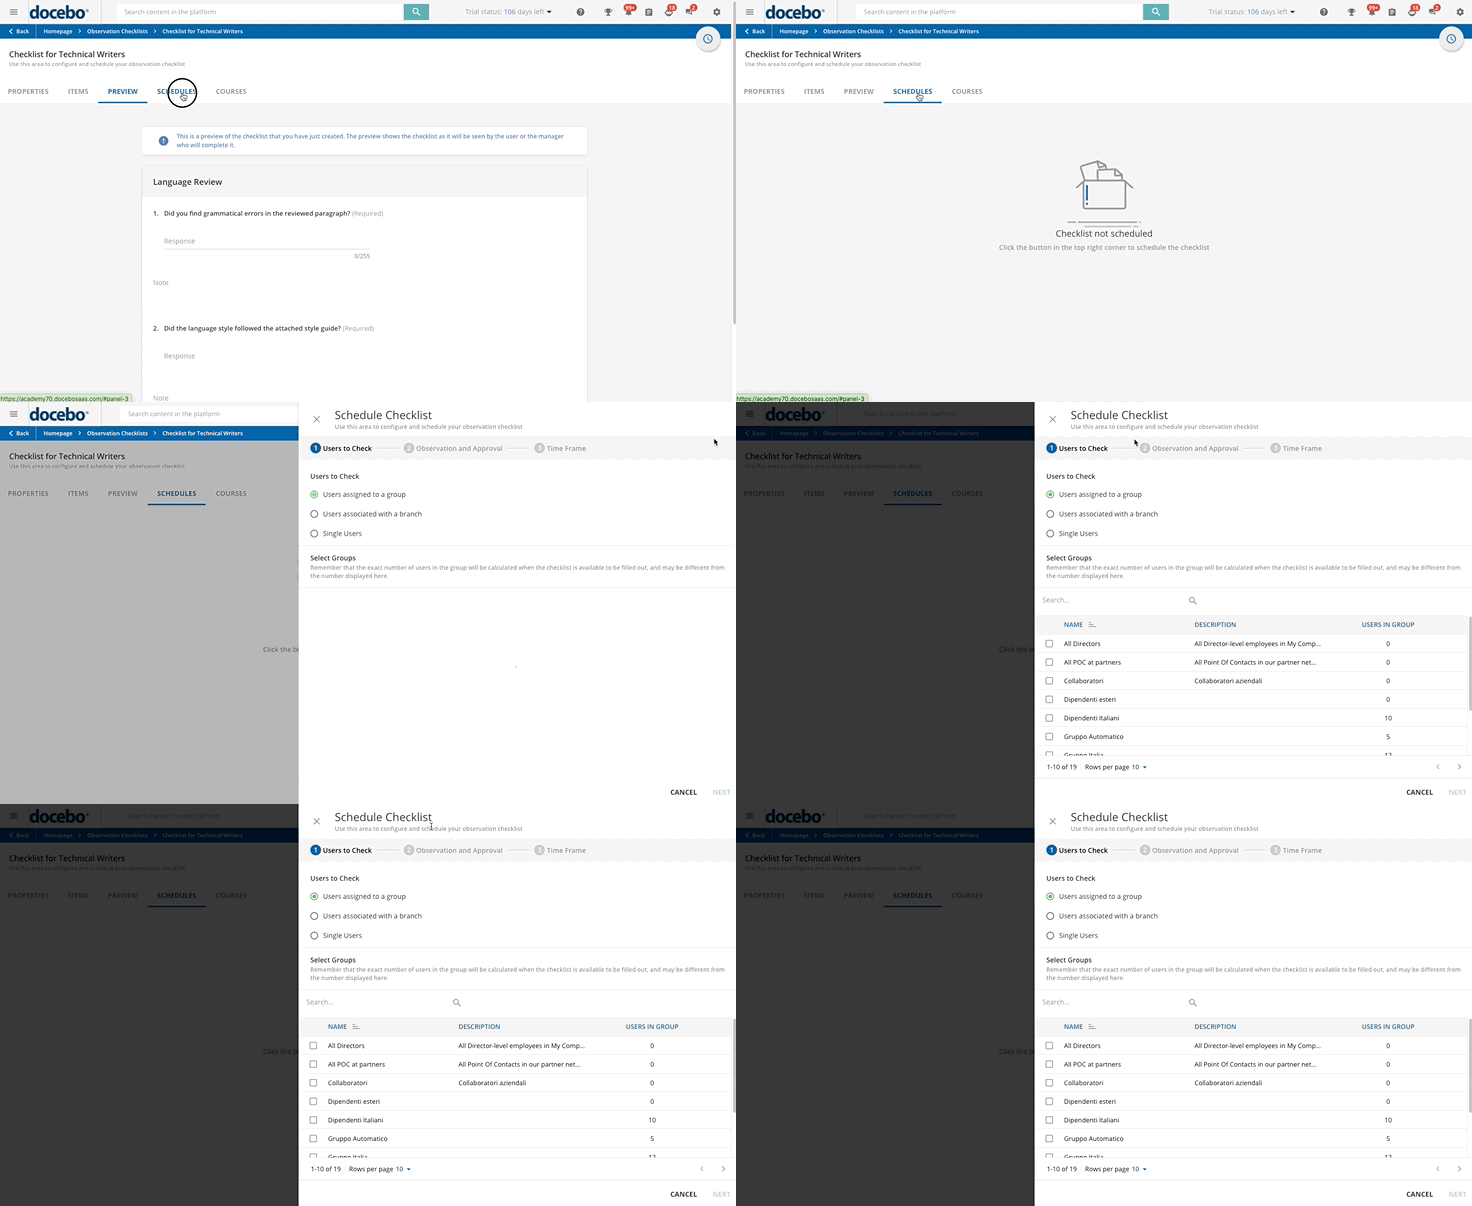
On your checklist’s page, move to the Schedules tab, where you can configure and schedule the observation checklist that you are creating or manage the schedule of an existing checklist. If you haven’t scheduled the checklist yet, you’ll find an empty page without any schedules for that checklist. If you have already scheduled that checklist, you’ll find all of the schedules for that checklist in the table in the Schedules tab.
To schedule your checklist, press the clock icon (schedule checklist) in the top right corner of the page. The Schedule Checklist right panel will open. This area is divided into three steps:
First Step: Select the Users to Check
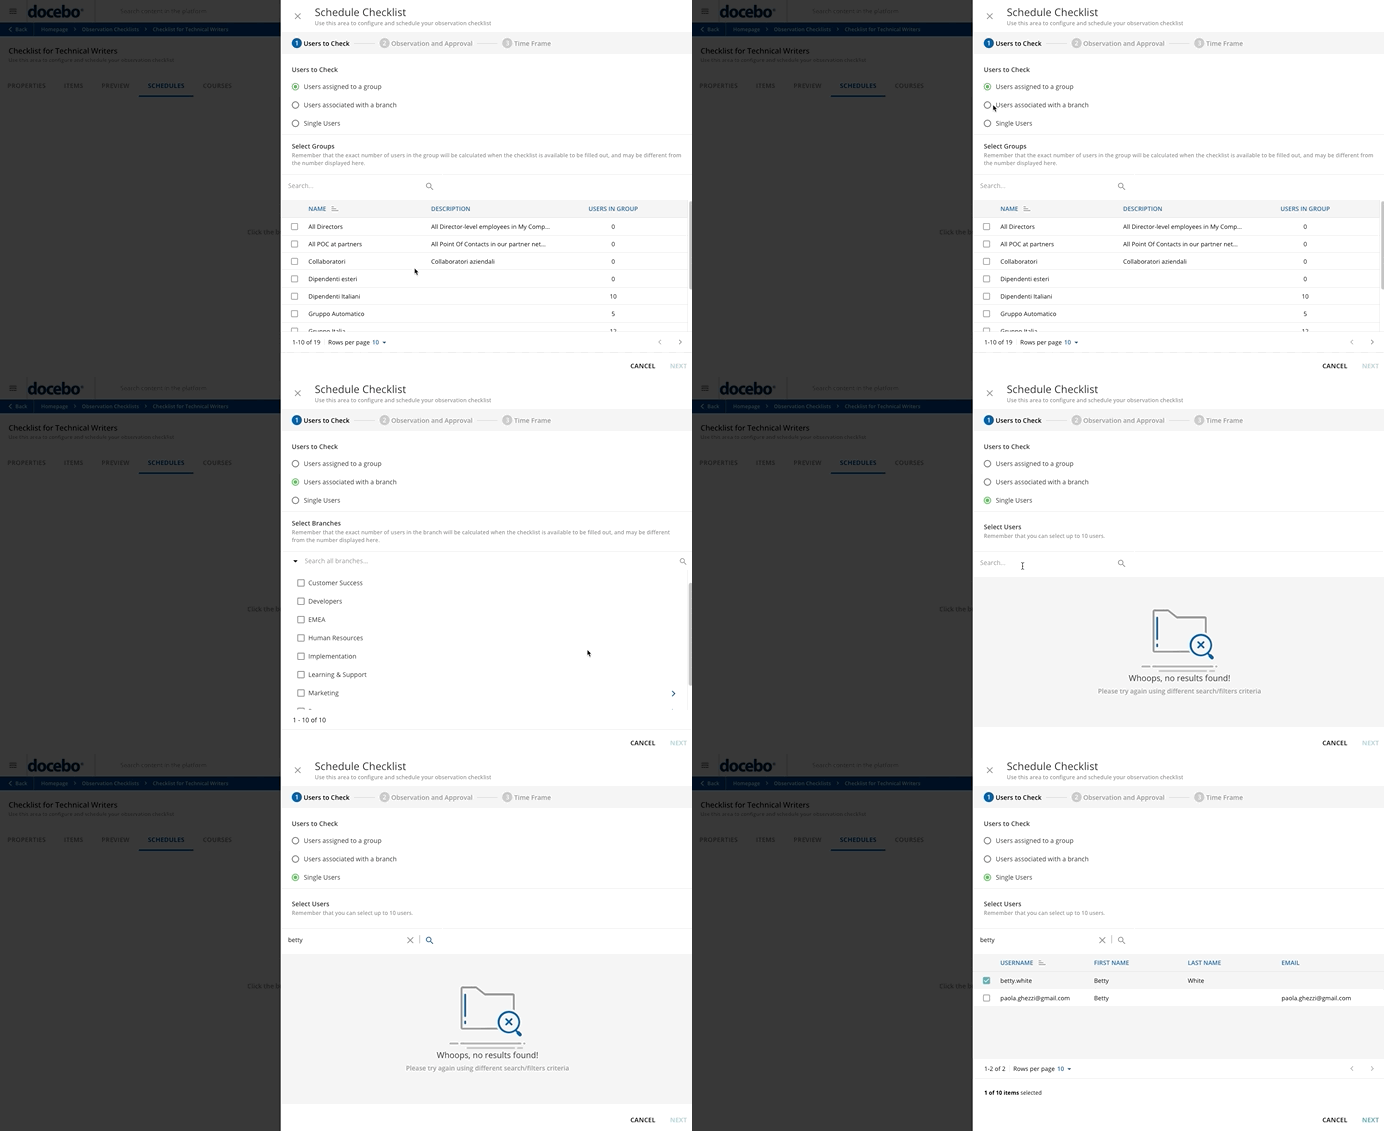
In the first step, decide the users who will be checked. You as the Superadmin can choose users assigned to a group, users associated with a branch or single users. Then, select the group(s), the branch(es) or the single user(s) (remember that you can select up to 10 single users) from the corresponding table at the bottom of the Schedule Checklist panel.
Please Note! When you select a branch, its sub-branches are not automatically selected. If you want to select one or more sub-branches, you need to click the arrow button on the right side of the branch row and manually select the sub-branches you want to add.
Find out more about groups and branches. When you have completed this step, select Next to go to the second step.
Second Step: Set the Checklist Observer and the Checklist Approval
In this step, you can decide who will fill out the checklist (the observer), and you can also choose a person in charge of approving the checklist.
Checklist Observer
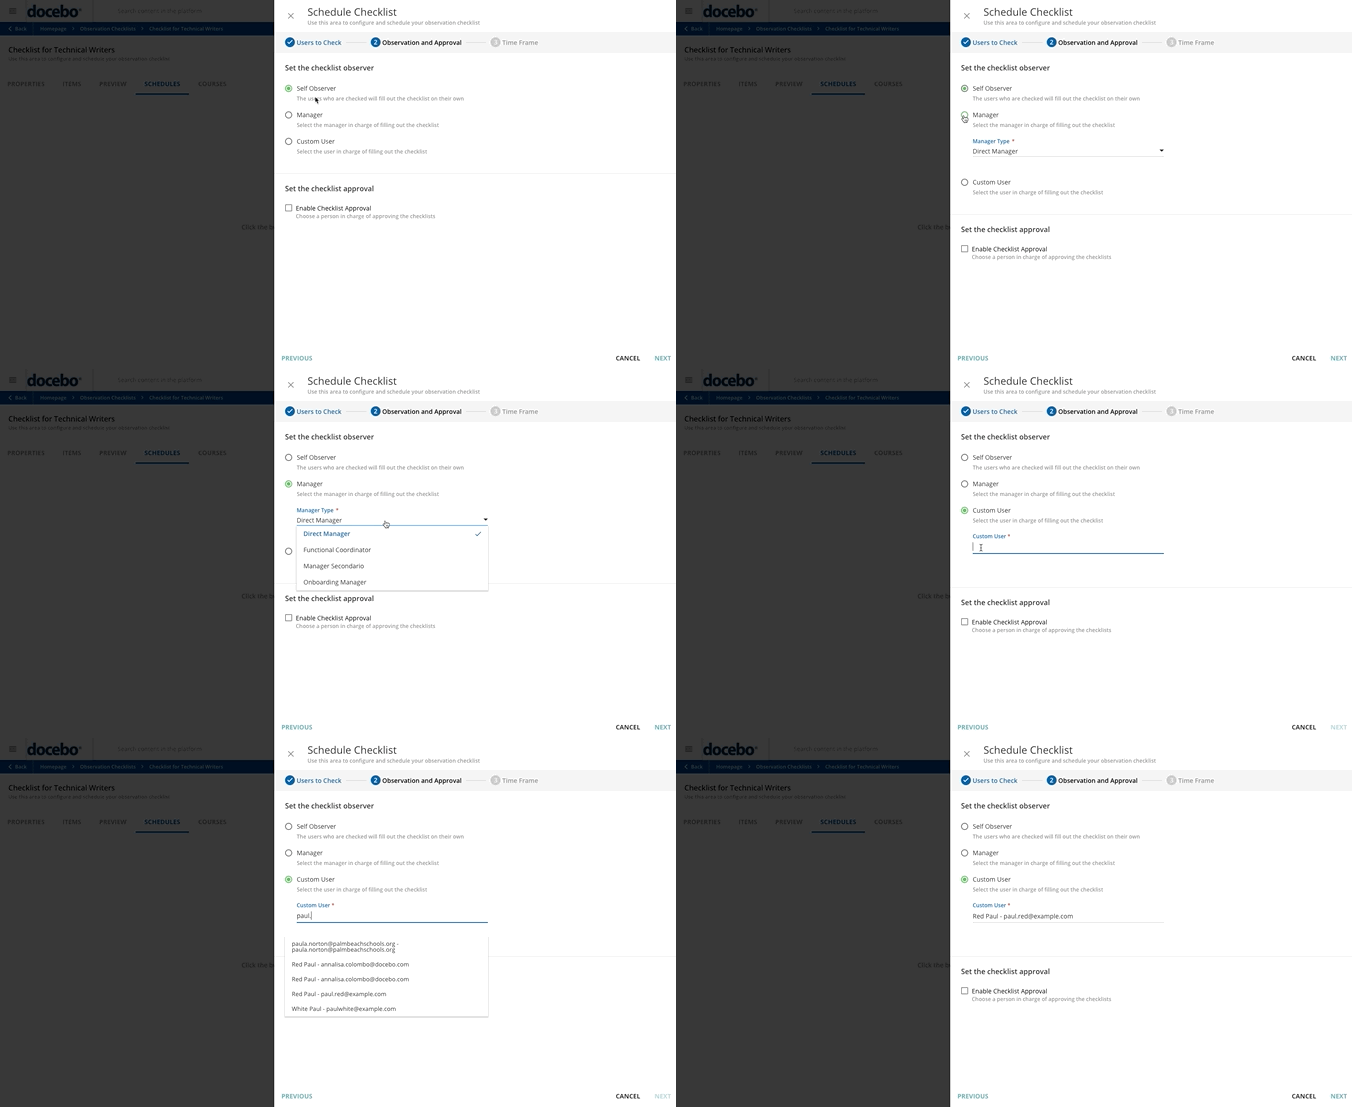
You can set if the checklist will be completed by the users who are checked (Self Observer option), by a manager (Manager Observation option) or by another user in the platform (Custom User option). If you choose the Self Observer option, the users that you selected in the first step will fill out the checklist on their own.
If you choose the manager option, the managers of the users selected in the first step (single learners or learners who are part of the group(s) or branch(es) you selected) have to complete the observation checklist. When you choose the manager option, you must also select the manager type from the dropdown list.
Managers who have to fill out the checklist will receive a notification in the platform’s Notification area, and then manage, from their My Team page, the checklists where their team is observed. Instead, managers will use the My Checklists page to find all the checklists that they need to complete in one place.
More information on how managers can complete and manage observation checklists for their teams.
If you choose the Custom User option, the checklist’s observer who will complete the checklist will be a peer user that you choose from the list of users that appears in the menu below the option after you start typing the name of the peer user. Users who have to complete the checklist will receive a notification in the platform’s Notification area, and then fill out the checklists assigned to them in their My Checklists built-in page.
You must add the My Checklist page to the users' main menu in order for them to quickly and easily access that page. Remember to add this page for your users, because it is not enabled by default. More info about how users can fill out and manage their observation checklists.
Checklist Approval
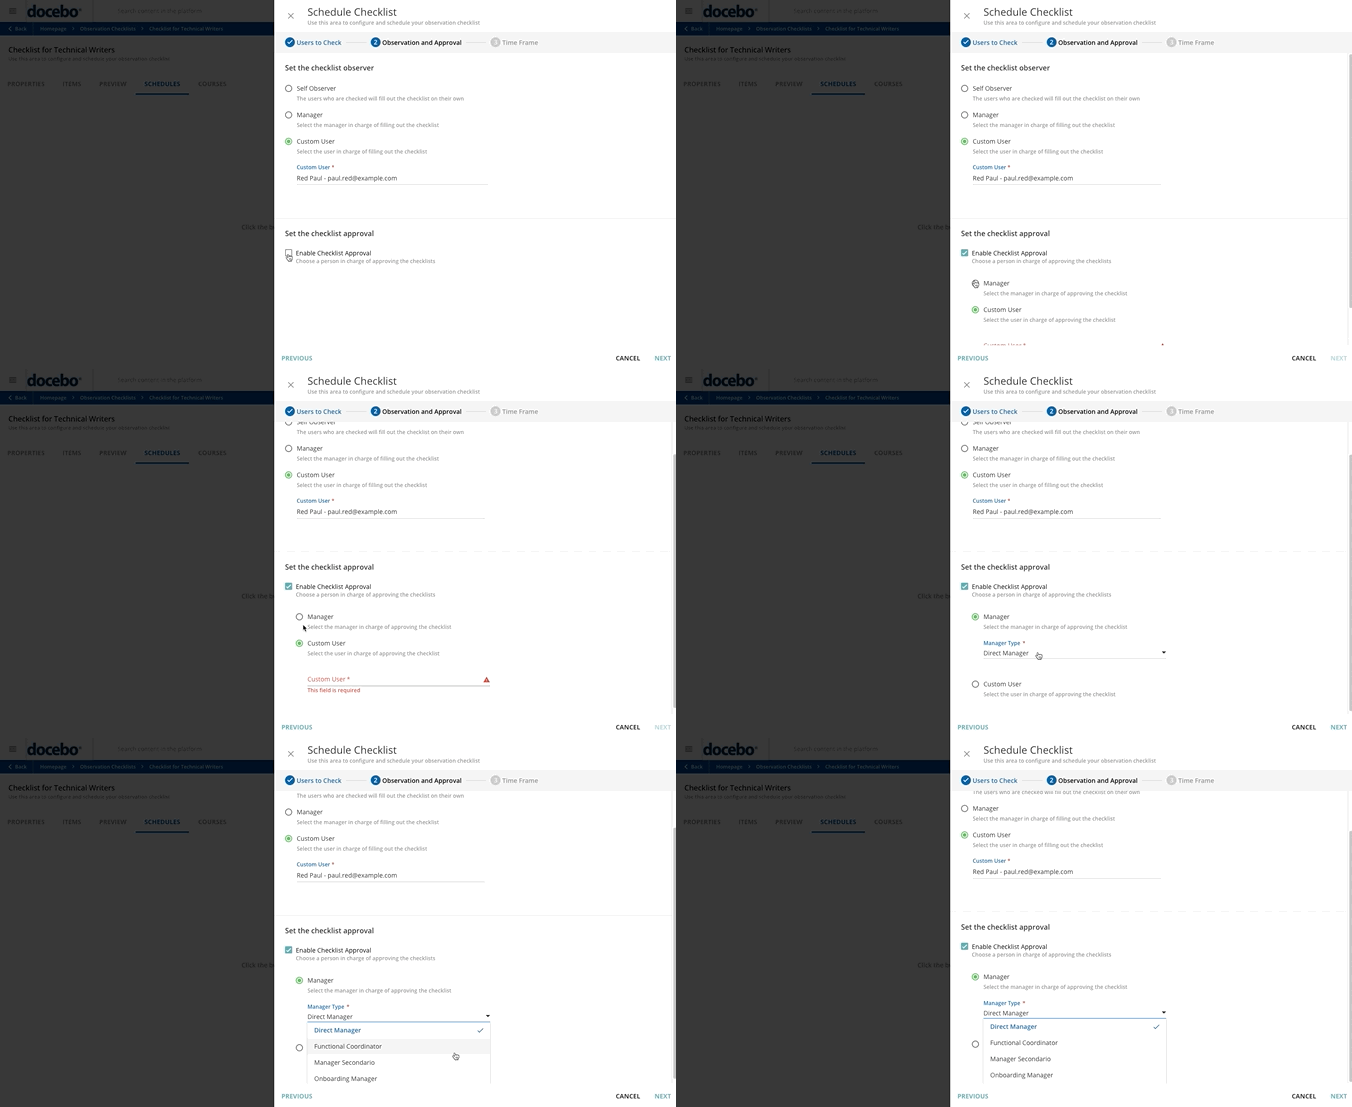
You can also decide if the checklist that you are configuring needs to be approved by another person or not by flagging the corresponding checkbox.
Once selected in the checkbox, two options will appear below. You can choose between a manager and a custom user who is in charge of approving your checklist, then select Next to go to the following step.
If you select the manager option (and choose the manager type), the manager of the users who completed the checklist has to approve or reject the checklist.
If you want the checklist to be approved (or rejected) by a specific peer user, select the Custom User option and insert the name of the user in the field below the option.
Managers or users who have to approve the checklist will receive a notification in the platform’s Notification area, and then review the checklist assigned to them for approval, deciding whether to approve the checklist or to reject it. If it is rejected, the checklist is sent back to the user who completed it (the observer) so that he/she can correct the responses he/she gave. In both cases, observers receive a notification informing them about the approval or rejection of the checklists they filled out.
Once again, when you have completed this step, select Next to go to the following step.
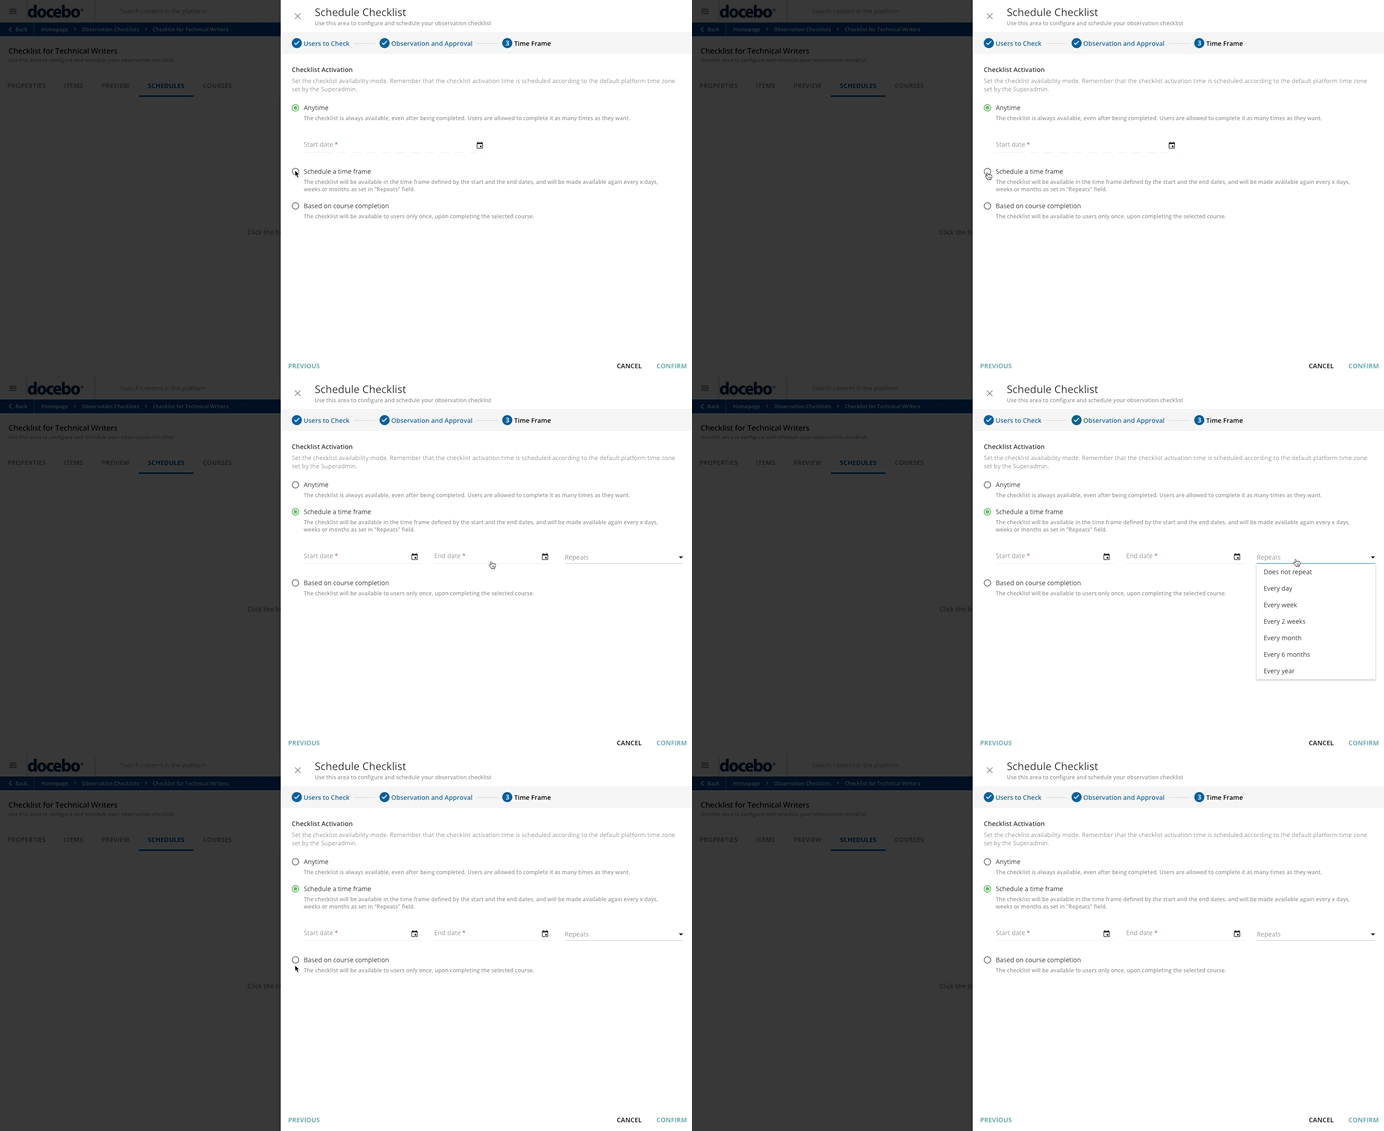
Third Step: Schedule a Time Frame for Your Checklist
In the Time Frame step, set when the observation checklist is activated. If you choose the Anytime option and set the start date, the checklist is always available (starting from the date you set). Users can complete the checklist as many times as they want and their checklist is always available, also after they complete it (it is available immediately after completion).
When you select the Schedule a time frame option, the checklist will be available during the time frame defined by the start and end dates you set. If you want your checklist to be repeated, set the repetition from the Repeats dropdown menu. When selecting the repetition interval, always consider that the number of days included in the timeframe between the Start Date and the End Date must be a multiple of the selected interval. If for example, the start date of the timeframe is March 1, and you want the checklist to be repeated every 2 weeks, then the end date of the timeframe must be set to March 14.
Remember that you can also set the current date as the start date of your checklist.
If you need your users or managers to complete a checklist in conjunction with a specific event (when they complete a course), select the Based on course completion option and then type the course name in the text field below. When selecting this activation mode, please consider the following:
- once the schedule is activated, the platform looks for the courses completed in the last 24 hours and sends the checklist to the users who completed those courses in that time frame. This means that if the schedule is created at 10:00 AM, the checklist will be sent to all of the users who completed a course after 10:01 AM of the previous day.
- if the user is unenrolled from the course linked to the checklist either by a Superadmin or a Power User (with granted permissions), or because the user is renewing the certification linked to the course, the checklist will be automatically re-scheduled and re-sent when the user re-completes the course.
Once finished, press Confirm. Now, a message at the bottom of the page will inform you that your checklist has been successfully scheduled.
Please Note! Your checklist may be available to your users up to three hours after you schedule it. Also remember that the time frame you set is a soft deadline, meaning that the observers you chose in the previous step of the configuration process can complete the checklists even after the end date you set. You can easily recognize when your users are late in filling out their checklists by the warning in the Checklist Validity column of the table of schedules in the Schedule tab.
Once finished scheduling your checklist, it will appear in your checklist’s schedules table shown in the Schedules tab. Here, you can edit or delete the schedules if you need it. To do so, click the ellipsis icon at the end of the checklist row that you want to edit or delete and select the corresponding option from the dropdown menu.
Please note that when deleting a schedule of your checklist, you can choose to delete also the checklists that have already been assigned to users, but that hasn’t been completed yet. Please note that if you create a checklist and complete its scheduling (deciding the users who are checked, who will fill out the checklist and when), but without adding any items to the checklist, it will not be assigned to any users, so no user will be asked to complete it.
Was this article helpful?
That’s Great!
Thank you for your feedback
Sorry! We couldn't be helpful
Thank you for your feedback
Feedback sent
We appreciate your effort and will try to fix the article
