Creating an Observation Checklist
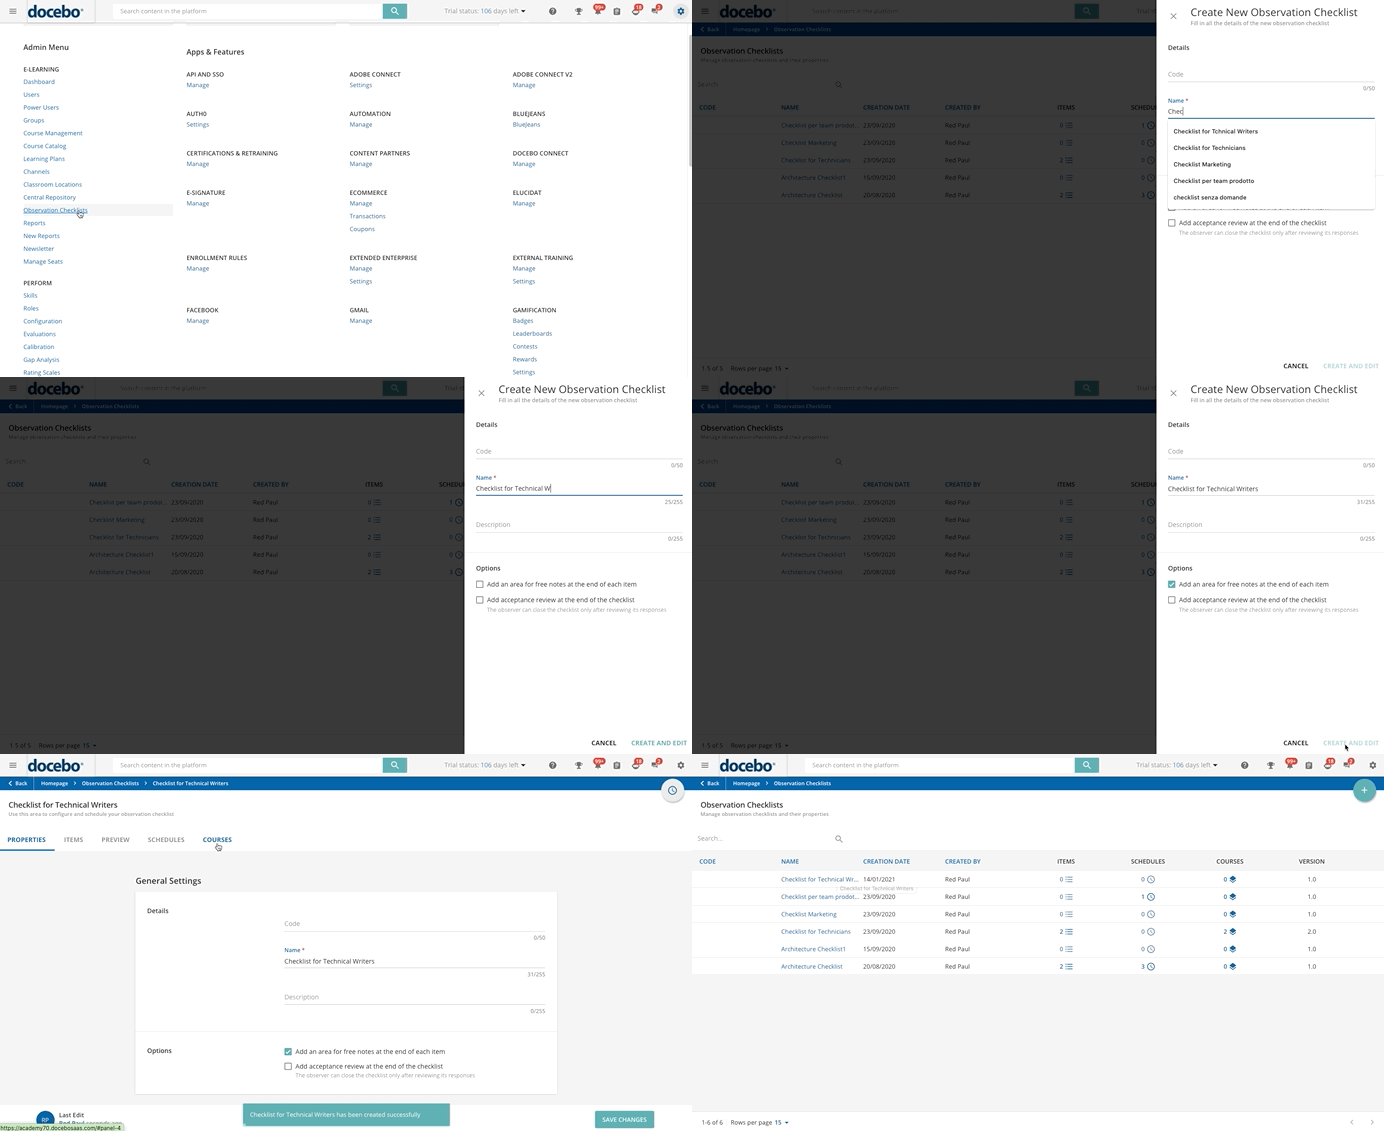
As a Superadmin, begin by accessing the Admin Menu from the gear icon in the top right corner of your platform to create an observation checklist. Then, select the Observation Checklists option in the E-Learning section. On the Observation Checklists page, you can create and manage your checklists.
Please Note! Power Users with granted permissions can create and manage their own checklists and manage the checklists created by the users assigned to them. Find out more about list of Power Users permissions.
If you haven’t created any checklists yet, you’ll find an empty page without any checklists displayed. If you have already created one or more checklists, you’ll find them listed on the Observation Checklists page, where you can view the details of the checklist, edit them, duplicate or delete the checklists.
To edit, duplicate or delete a checklist, click the ellipsis icon on the right side of the checklist, then select the corresponding option. When you duplicate a checklist, a new checklist is created and it will contain the same items (and groups of items) and have the same configuration as the ones in the checklist you duplicated.
Once you have duplicated one of your checklists, you can then edit and schedule it according to your needs. Of course, your new checklist won't contain any schedules, so you won't see any schedules in the Schedules column on the Observation Checklists page. Please refer to the Scheduling and Selecting Users for a Checklist section below in this article to learn how to schedule your checklist. Please note that you can also duplicate your duplicated checklist.
You cannot delete a checklist if it is associated with one or more courses. To be able to delete it, first, you need to remove the checklist training material in each of the courses where it has been added.
By clicking the icon in the Courses column in the table of the page, you will be redirected to the Courses tab, where you will see the list of courses the checklist has been associated with.
To create a new checklist, press the plus icon (New Checklist) in the top right corner of the page. The Create New Observation Checklist right panel will open. In the Details section, insert a code, a name, and a description for your checklist. The only mandatory field is Name.
If you want to add an area for free notes at the end of each item of the checklist, select the corresponding checkbox in the Options section below. Additionally, if you want the observer (the person who fills out the checklist) to review the checklist responses in order to close it, select the acceptance review flag in the Options section. By enabling this option, at the end of the checklist, the observer will do an acceptance review of the completed checklist.
In order to close and send the checklist, the observer must select the thumbs up if he/she accepts the checklist responses, or the thumbs down if he/she doesn’t accept them.
Please Note! The checklist will be completed regardless of the observer’s response, thumbs up and thumbs down.
When finished configuring the checklist properties, press Create and Edit.
Was this article helpful?
That’s Great!
Thank you for your feedback
Sorry! We couldn't be helpful
Thank you for your feedback
Feedback sent
We appreciate your effort and will try to fix the article
