DISCLAIMER: Some content in this article outlines how to use functionalities that will be publicly released to clients between September 21 and December 31, 2022. If you see differences between this article and your platform, you can download a PDF version of the documentation for the prior release.
Introduction
In your learning platform, you can create custom reports to view and analyze specific information about courses, users, training material or apps that you’ve activated. You can also schedule when to send a custom report so that it will be automatically sent via email, and view a preview of the report that you created and configured.
In the following sections of this article, we’ll outline how to create, configure and schedule your custom reports. To discover all of the types of custom reports available in your platform, refer to this article. Read this guide to find everything you need to know about how to best transition to the New Custom Reports feature (the guide also outlines some useful Q&As).
For the proper functioning of custom reports, if you are using a custom domain, make sure that your custom domain is fully secured using HTTPS.
Use Case Scenarios
A useful scenario for a Users-Courses report in a company is using the report if you need to analyze which are the activities performed by your users in the courses you created for them (for example, how many times your users accessed the course, their scores in tests, number of users enrolled in the course, etc.).
In this way, as a platform admin, you’ll be able to keep your managers and colleagues always updated with the progress of the learning activities set up by your company. By having the tools to analyze learners’ progress for each course, you can improve your employees’ learning performance (and thus increase value for the company) by tailoring courses and training material to their needs and skills.
Another scenario for custom reports is when by analyzing the data extracted by a report you discover that, for example, your users access the course you created for them only once a month or spend only a few minutes in the course. Since your users are not dedicating enough time and effort to the learning activities you planned and created for them, you can perform some actions to make the training material in the course more interesting, and more focused or to adjust the difficulty level.
You can then run again the report (or create a new and dedicated one), and schedule it to be sent every week, so that you are able to analyze if, thanks to the changes you made, you achieved the desired results.
Creating a Custom Report
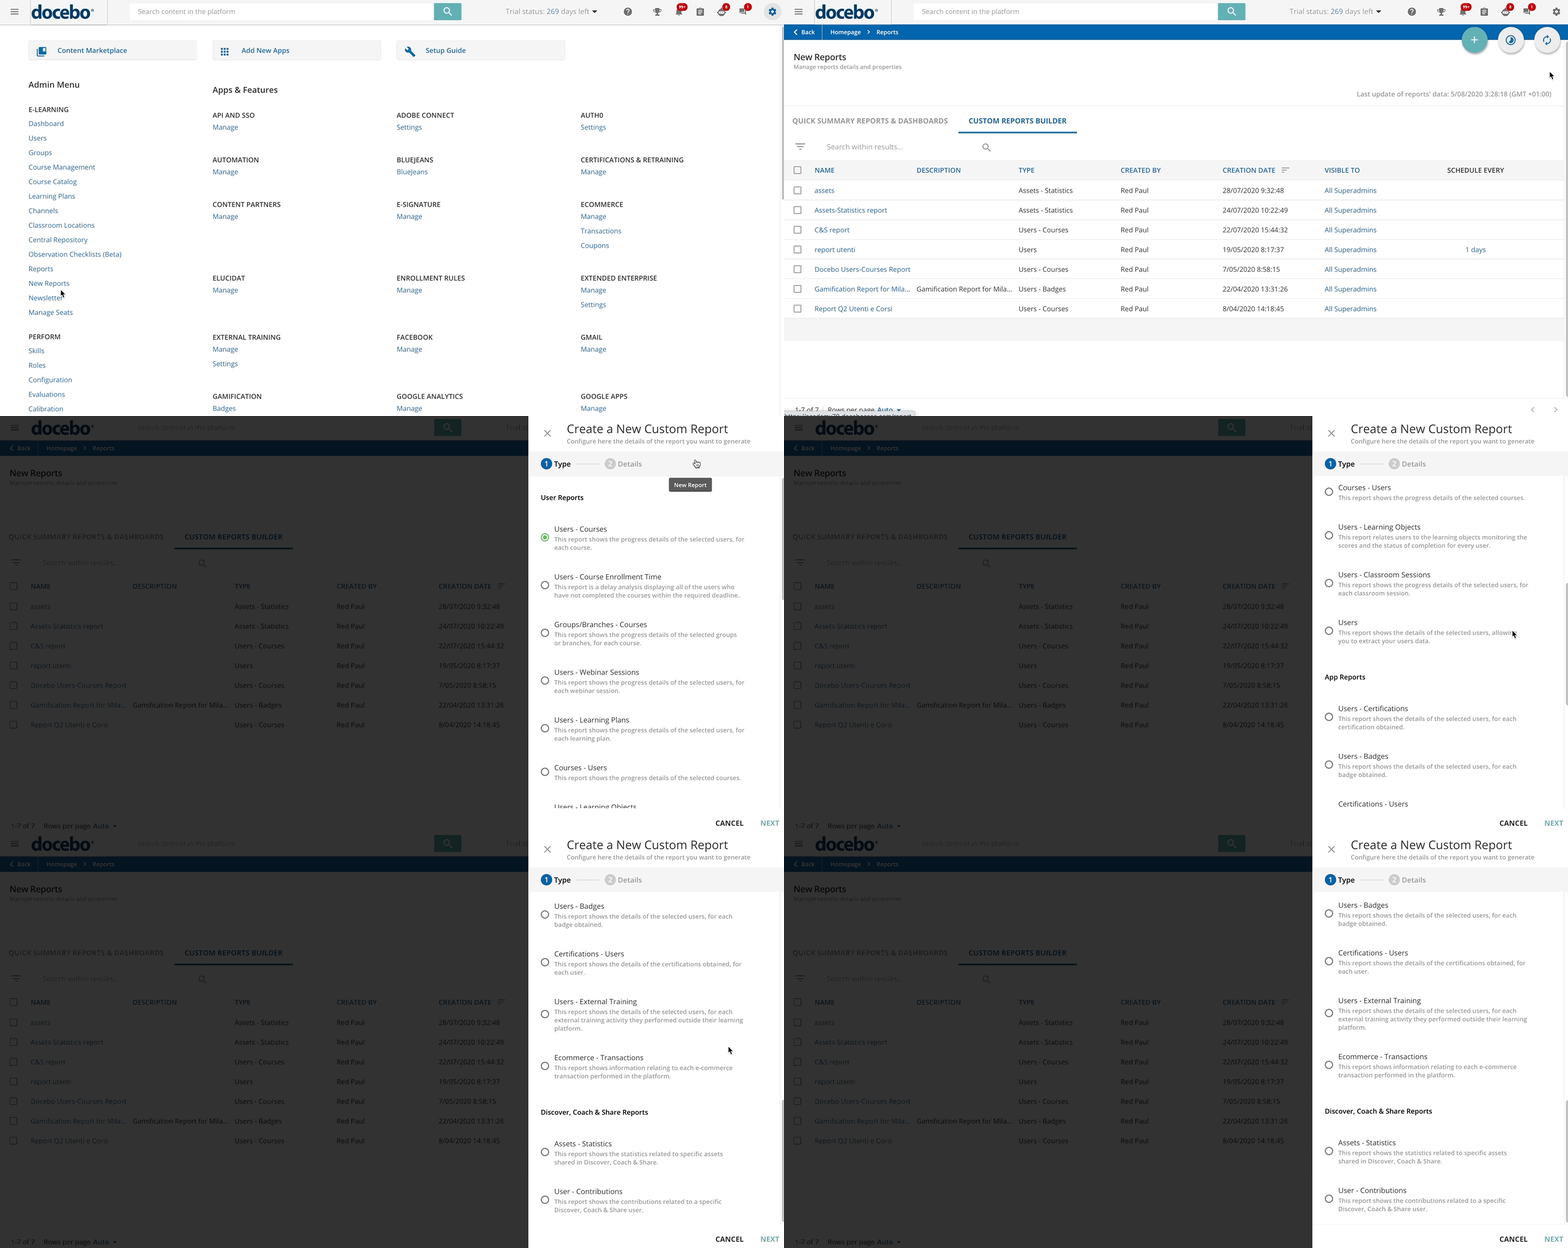
In order to create a new custom report, log into your platform as a Superadmin. Begin by accessing the Admin Menu from the gear icon in the top right corner of your platform. Then, select the New Reports item in the E-Learning section. On the main Reports page, switch to the Custom Reports Builder tab, where you can create and manage your custom reports.
If you haven’t created any reports yet, you’ll find an empty page without any reports displayed. If you have already created one or more custom reports, you’ll find them listed in the Custom Reports Builder tab, where you will view the details of the report, filter your reports by type, schedule status or creation details, and also search your reports using the search field in the action bar at the top of the page.
If you want to preview, schedule or pause the schedule, duplicate, export, edit or delete your report, click the ellipsis icon on the right side of the report row, then select the corresponding option.
To start creating the report, select the plus icon in the top right corner of the page. The Create a New Custom Report right panel will open, where in the first step (Type) you’ll select the type of report that you want to generate (the different types are listed and detailed in this article). When you’ve chosen the type, select Next to go to the second step.
In the Details step, insert a name and a description for your report. The only mandatory field is Name. When finished, press Create and Edit.
Please Note: When writing a name for your report, do not use special characters (the only special character allowed is the underscore “_”). If you use a language written in a non-latin alphabet, when you export your report via CSV, the report name will be latinized. Names written in Arabic characters could be truncated.
Was this article helpful?
That’s Great!
Thank you for your feedback
Sorry! We couldn't be helpful
Thank you for your feedback
Feedback sent
We appreciate your effort and will try to fix the article
