Introduction
As an instructor, you have the ability to manage some course settings within the platform for E-Learning, ILT (Instructor-Led Training) and VILT (Virtual Instructor-Led Training)courses.
When working with ILT/VILT course, instructors are either assigned to sessions or to events:
- Session Instructor. If you are the instructor of a session, you will be automatically assigned to all of the events included in the session and you will be able to mark the attendance for all of the events in the session and set whether the participants have passed them or not. You will also be able to create and update the training material for the course.
- Event Instructor. If you are the instructor of a single event within a session, you can mark the attendance for the learners attending that specific event but you will have no control over the other events or over the session. You can neither upload nor manage the training material assigned to the course.
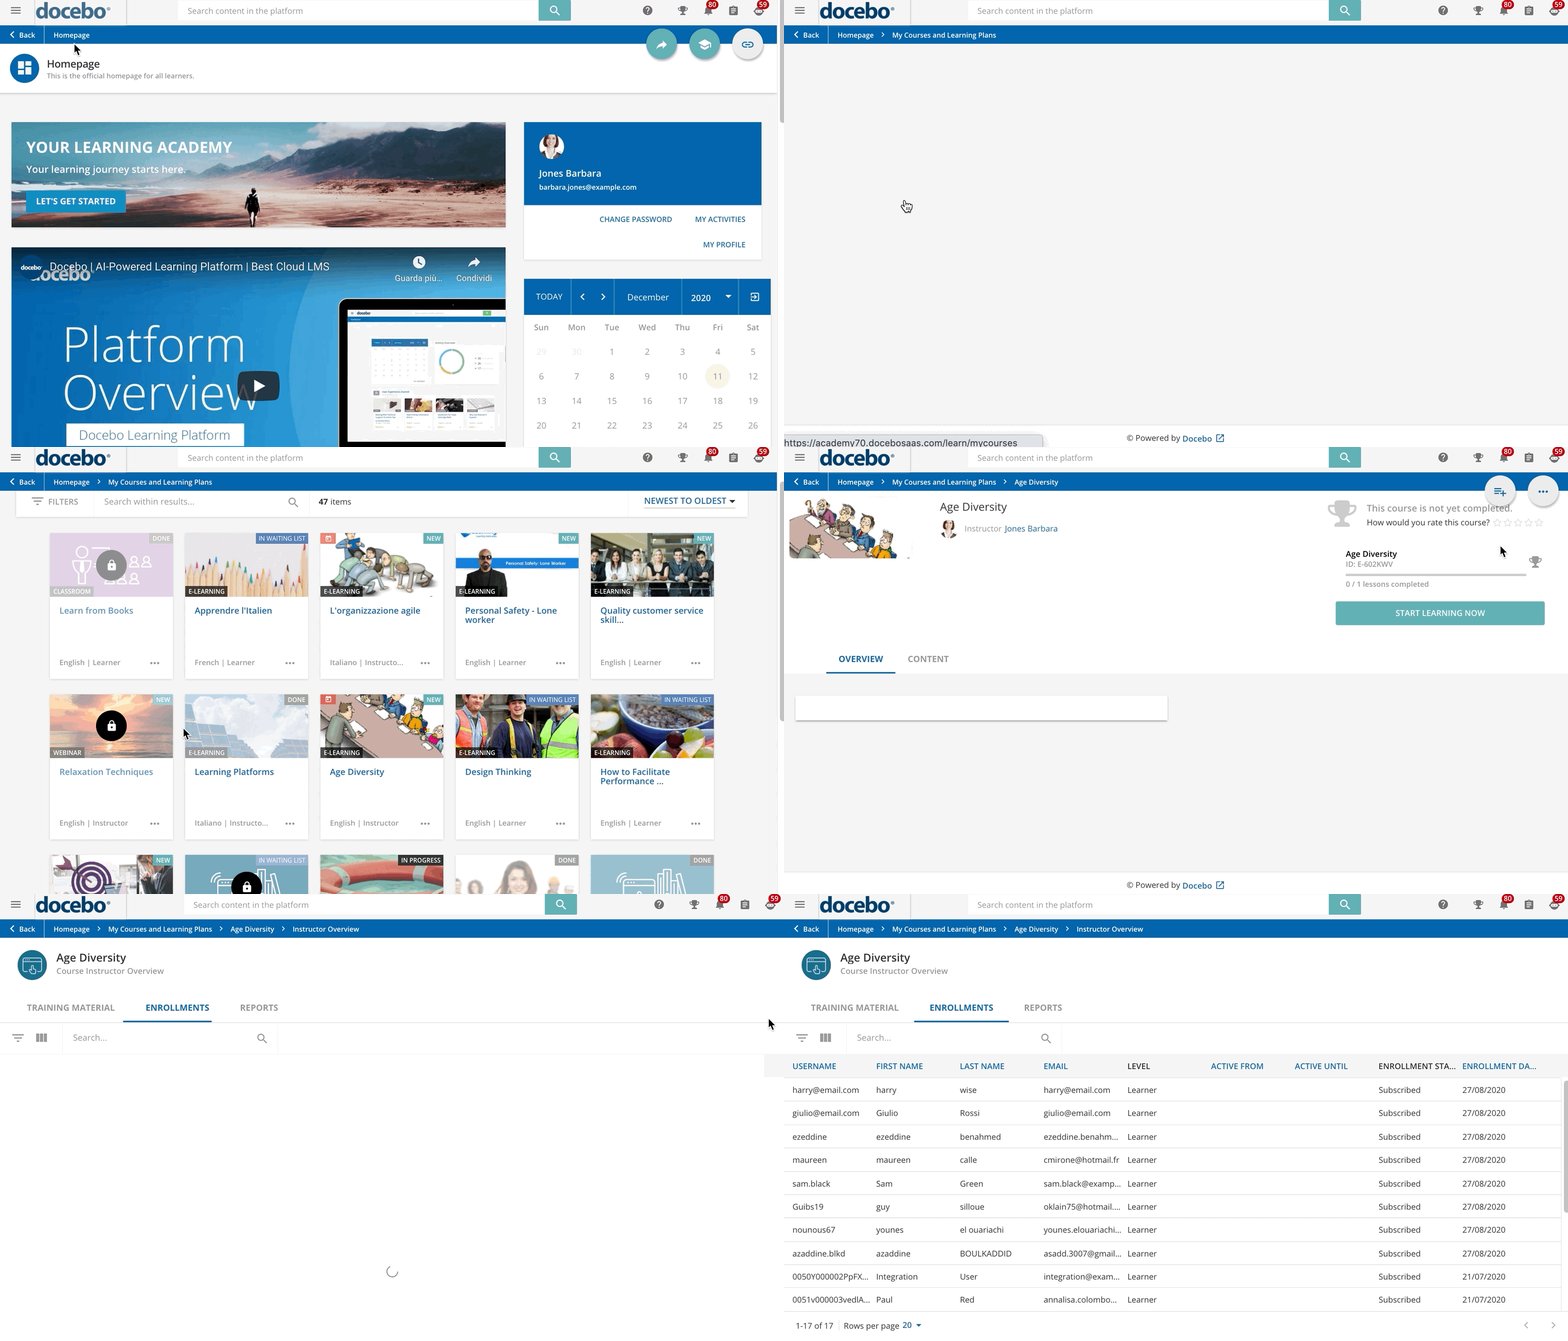
To access the course in which you’re an instructor, log into your learning platform, then access your main menu and select the My Courses and Learning Plans. Find the course card on this page, then click on the course card to access the course’s main page. You may be redirected to the course’s overview page, or directly to the course player page, depending on Administrator settings.
The My Courses and Learning Plans page also shows the courses you may be enrolled in as a learner. Have a look at the Learner Guide to learn more about navigating your platform as a learner.
Let’s go through all of the permissions you have as the instructor of a course.
Uploading Training Materials in Your Courses
As an instructor, you can upload training materials for the courses you manage. To do so, access your course from the My Courses and Learning Plans page, press the menu icon in the top right section of the page and then press the Training Materials button that appears below.
On this page, you will see the list of the training materials that are already uploaded within the course. To upload new training material, select the Add Training Material button, then select which type of training material you want to upload, import, or create.
Find out more on the training material options in our Knowledge Base, but remember that the articles in this section of the Knowledge Base are written from the perspective of the platform Administrator, therefore some information may not relate to you as a course instructor.
For most training material, you will need to select how users will view the content, a name, and a description for the content, as well as a thumbnail. Once the new content is successfully created in your platform, it will appear in the list of content on the Training Materials page. From here, you can edit or delete the training material, or edit the settings and prerequisites.
Managing the Layout and Content of Your Courses
Besides managing training materials, you can also manage the layout of the courses you manage provide additional information on the course, activate forums, and enable all of the features that you deem necessary for your course.
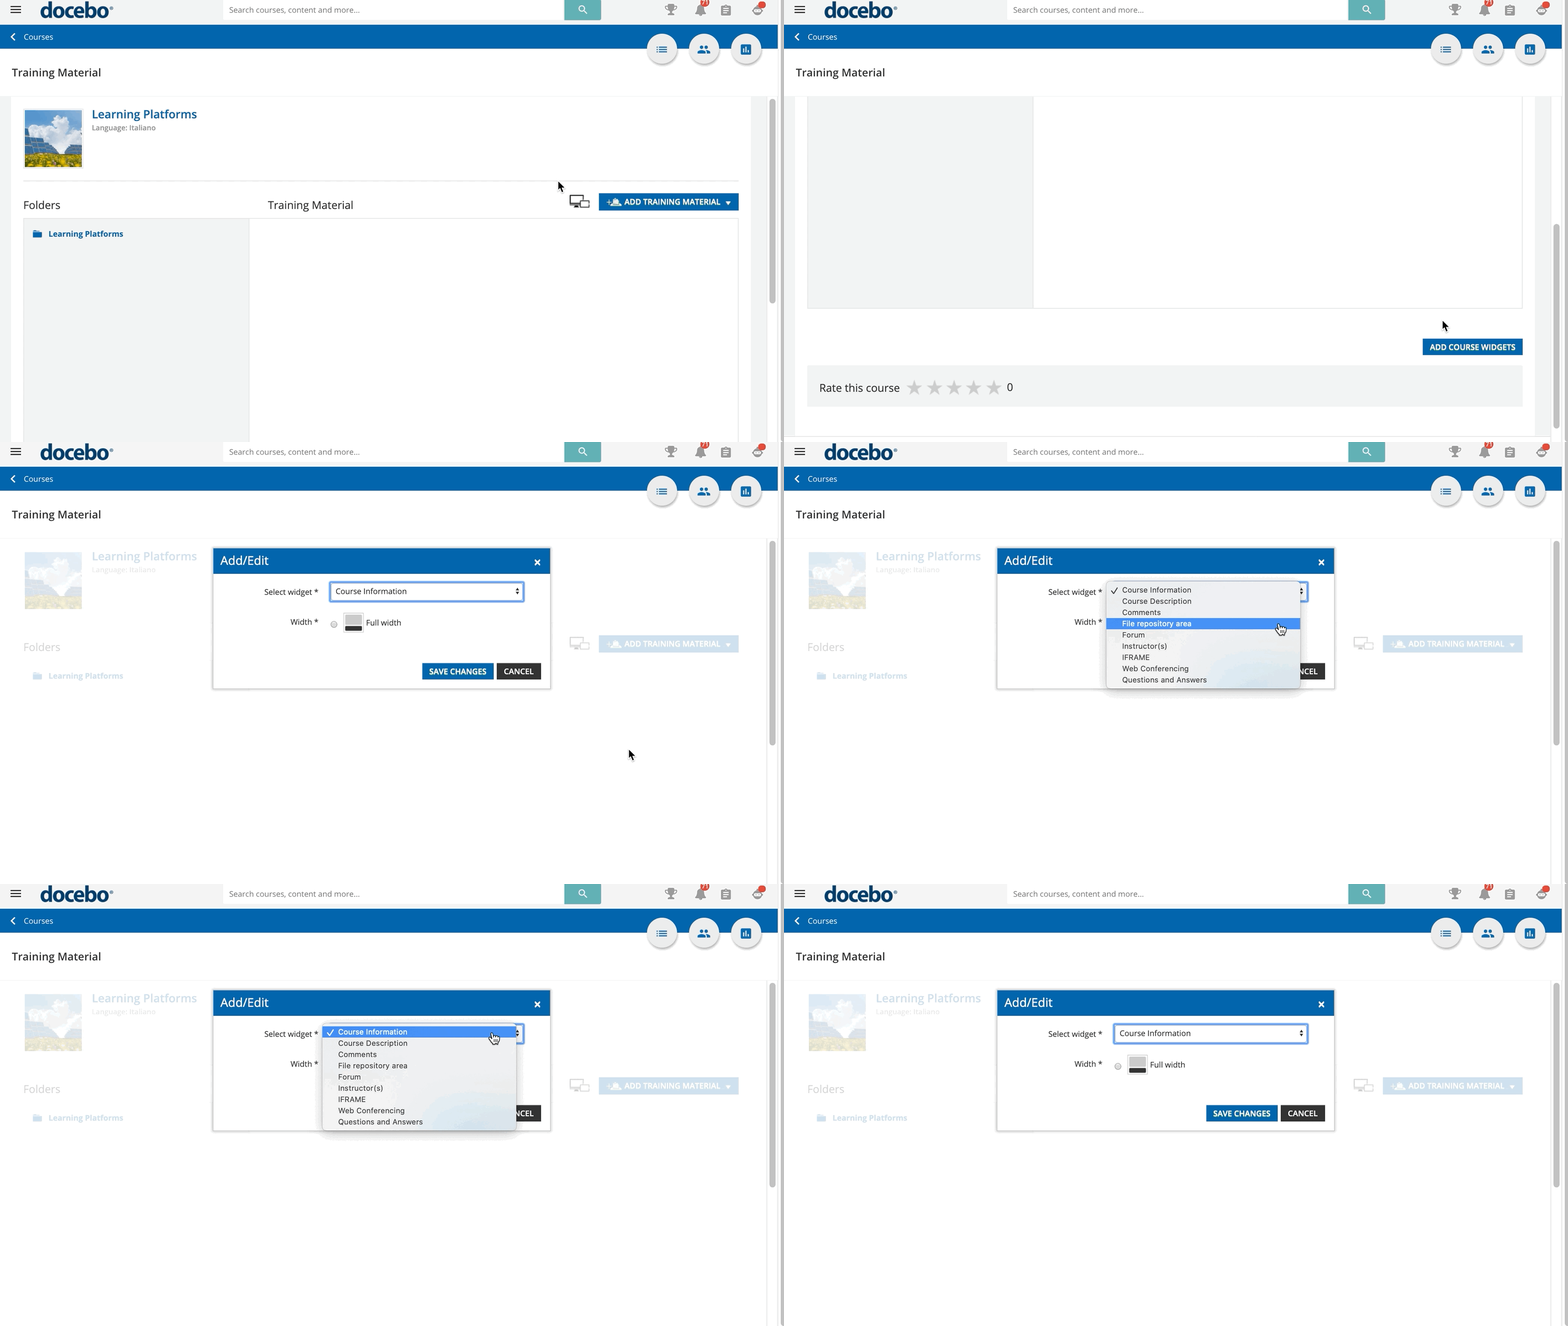
Once on the Training Material page, select the Add Course Widgets button underneath the training materials area. A pop-up box will appear.
Using the drop-down menu, you can choose among different course widgets.
E-learning Courses: Viewing Enrollments
As a course instructor, you are able to view all of the users enrolled in the e-learning courses that you’re instructing. From the course’s main page, press the menu icon in the top right corner, then select the Enrollments option.
The Enrollments page shows the list of all of the learners enrolled in the course, including the learners' names, whether they are enrolled as a learner, tutors or instructors, and their status in the course.
Use the search bar at the top to search for a specific learner, sort and filter users by group, branch, enrollment deadline, the level within the course, and status within the course.
As an instructor, you cannot edit enrollments for the courses that you’re instructing. You only have View permissions.
ILT and VILT Courses: Viewing Sessions and Enrollments and Managing Evaluations
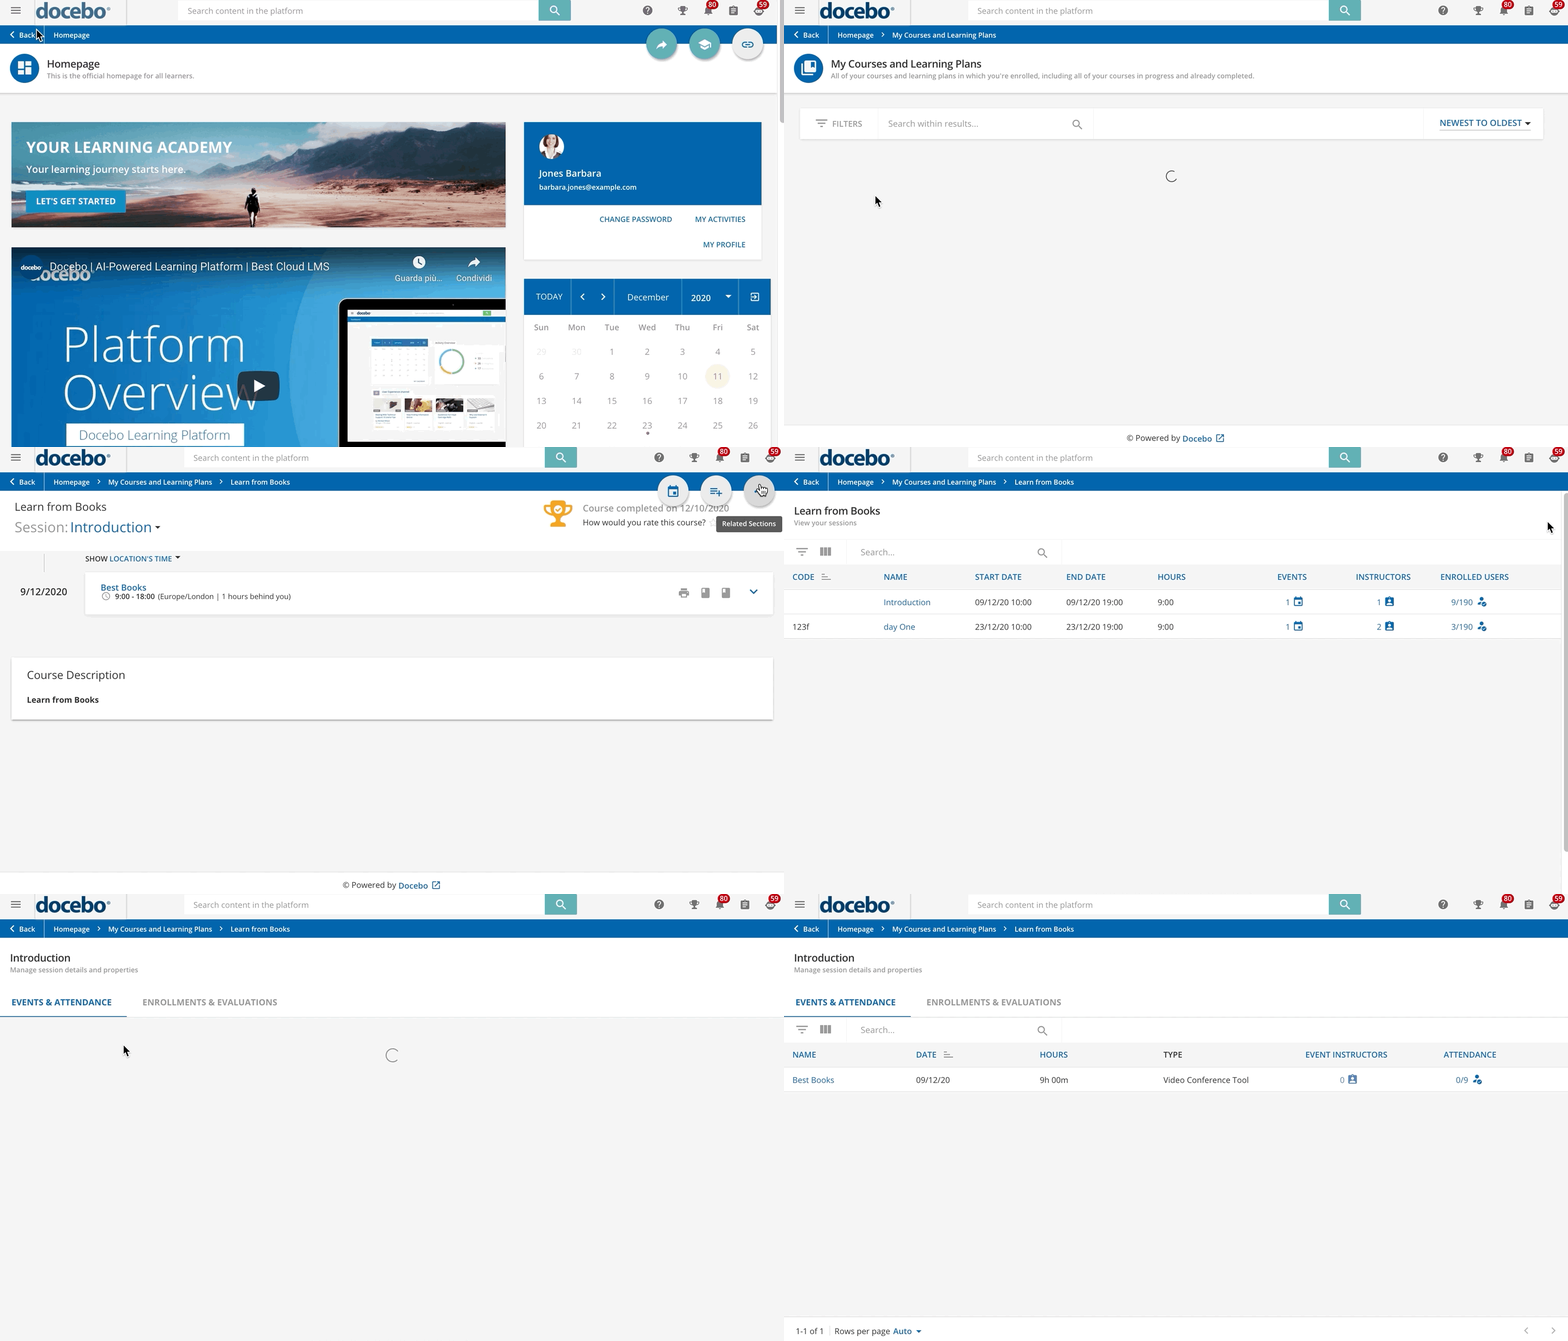
As a course instructor, you are able to view all of the users enrolled in the ILT (Instructor-Led Training) sessions that you’re instructing. From the course’s main page, press the menu icon in the top right corner, then select the Sessions option.
You will access a page listing the sessions composing the course, where you will be able to check their start and end date, duration as well as the number of events composing them, the number of instructors, and of enrolled users. Click on the session name to access the list of events (session dates) composing it.
The Events & Attendance tab lists the events composing the session, including their date and duration, whether it is a classroom course (Venue) or a webinar (Video Conference Tool), the number of instructors and the number of users attending the event out of the total number of users enrolled.
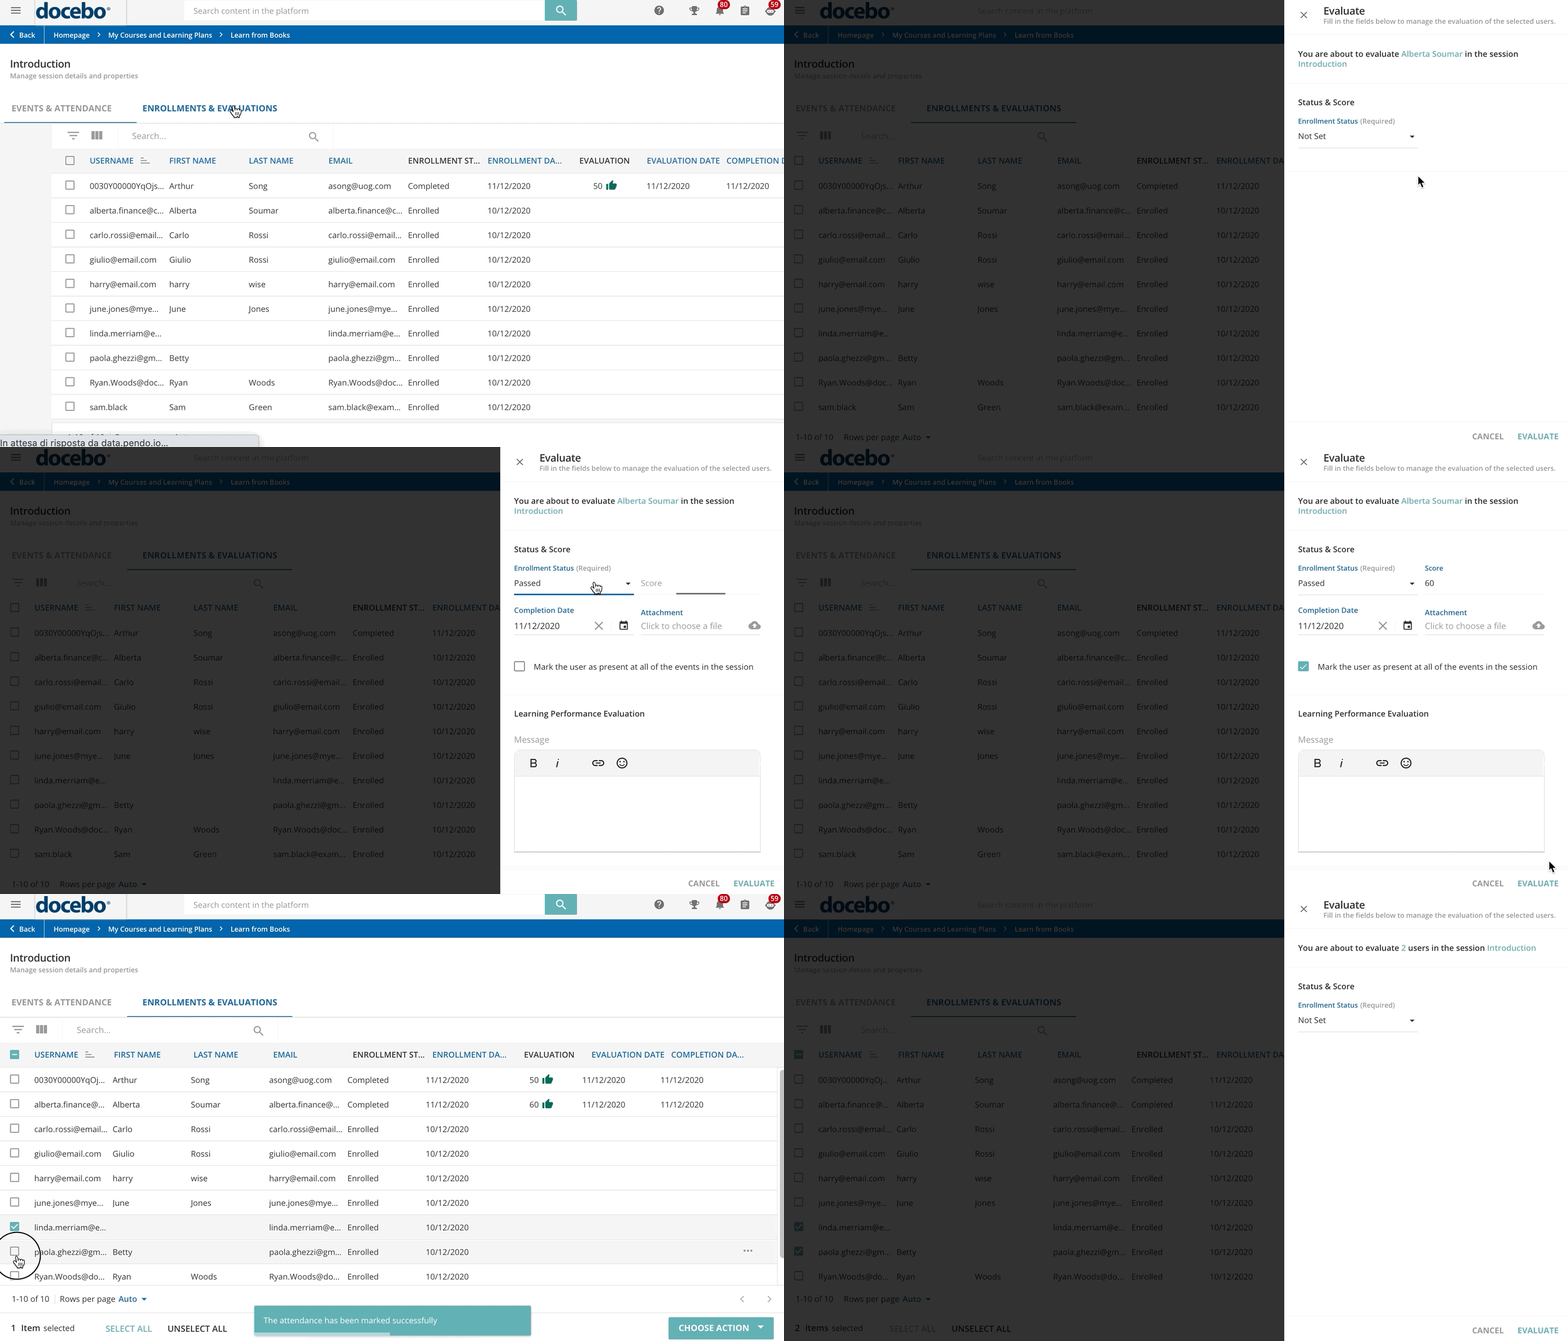
Move to the Enrollments & Evaluation tab to check the list of users enrolled in the session, their enrollment status and date, if they have completed the session, and whether and when they have been evaluated (if the course completion is based on an evaluation). In order to evaluate a user, click on the ellipsis menu at the end of the user row and select the Evaluate option.
In the right panel, set whether the selected user has passed the session (that means, all of the events composing it) or not, or leave the option to Not Set when the evaluation is not needed or will be done in the future. Set the user completion date to mark the session as completed. Optionally use the Score text box to assign a score to the user and attach a file (such as a certificate) if desired.
Flag the Mark the user as present at all of the events in the session option to mark the user's attendance to all of the events included in the session, instead of doing it for every event, in the event Attendance tab.
Finally, use the Learning Performance Evaluation text field to add comments to the evaluation. Please note that Instructors cannot evaluate themselves and cannot be evaluated by Superadmins.
To evaluate multiple users at a time, select them by flagging the checkbox next to their usernames and click on Choose Action at the bottom right corner of the page. Finally, select the Evaluate option.
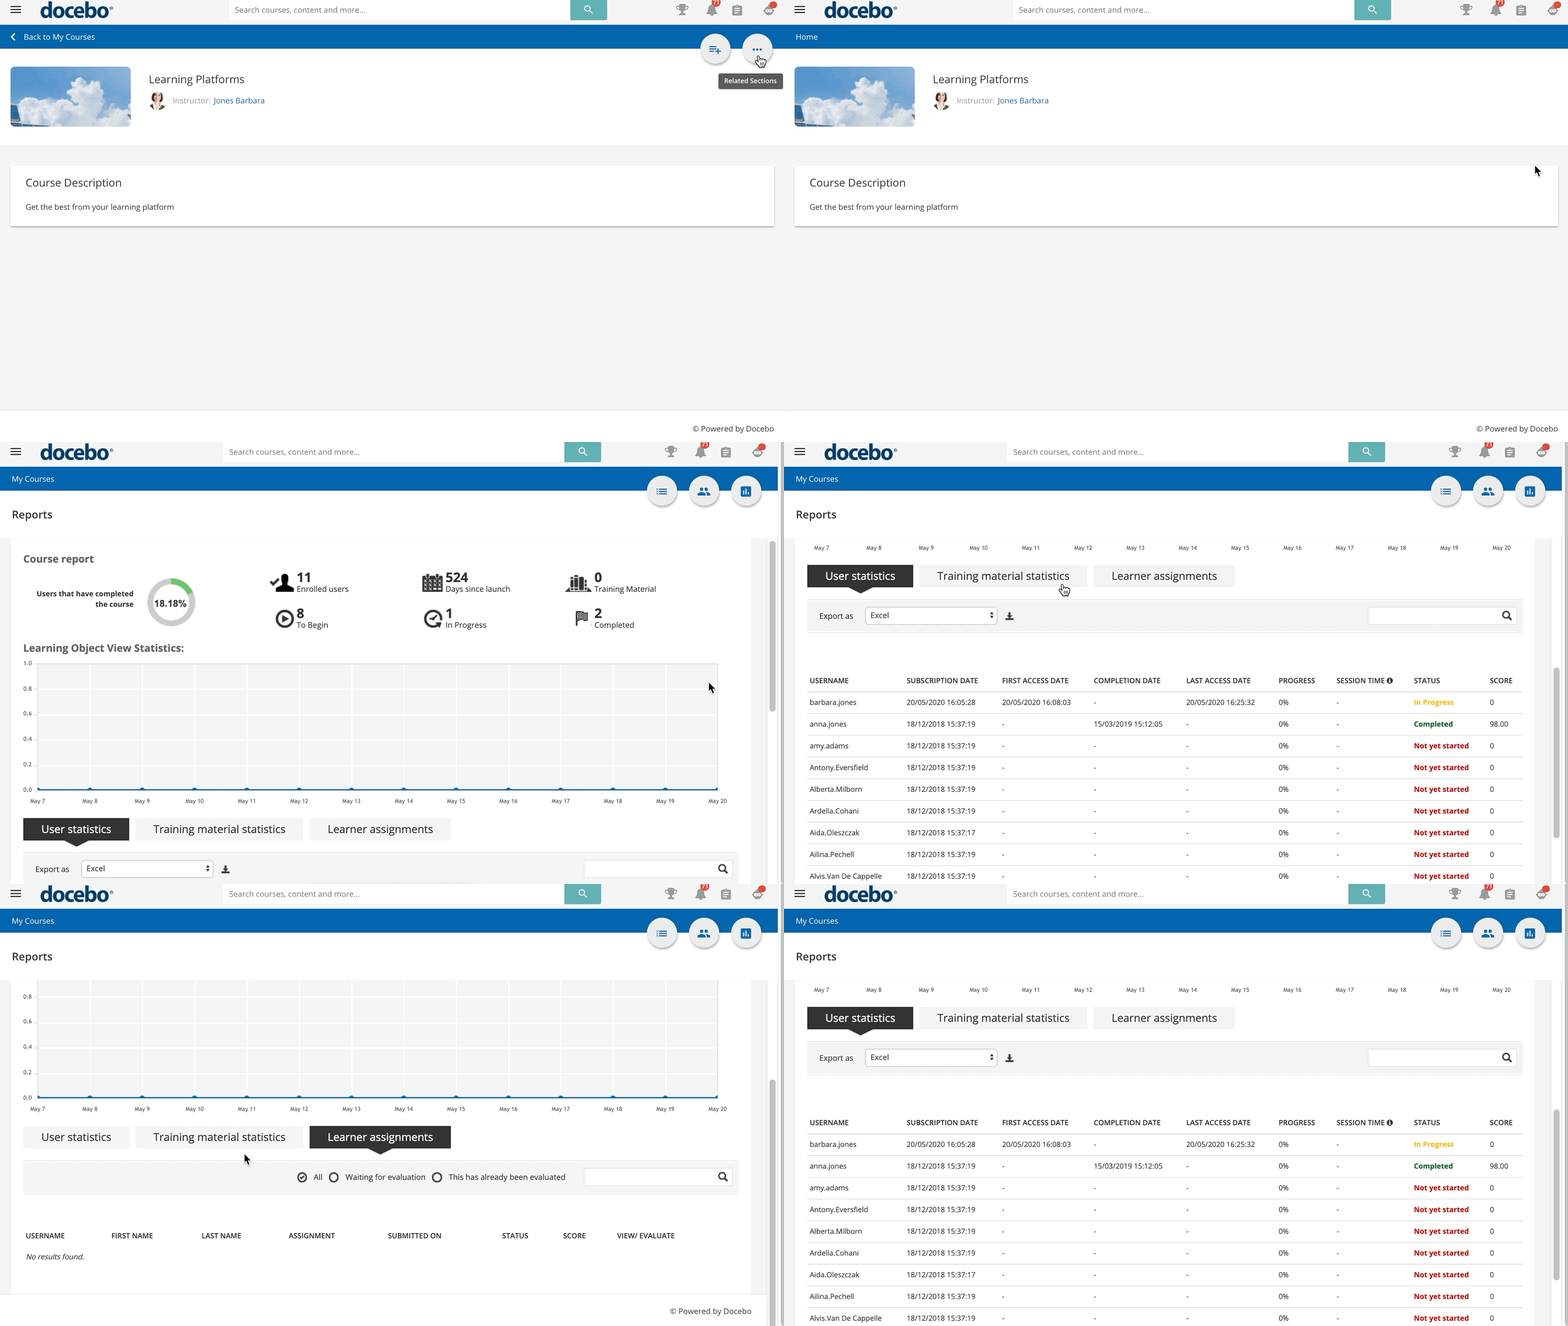
Viewing the Course Report
You can access the report of the course you are viewing by pressing the menu icon in the top right section of the page, and then select Reports.
More details on how to navigate the report.
Adding Webinar Recordings
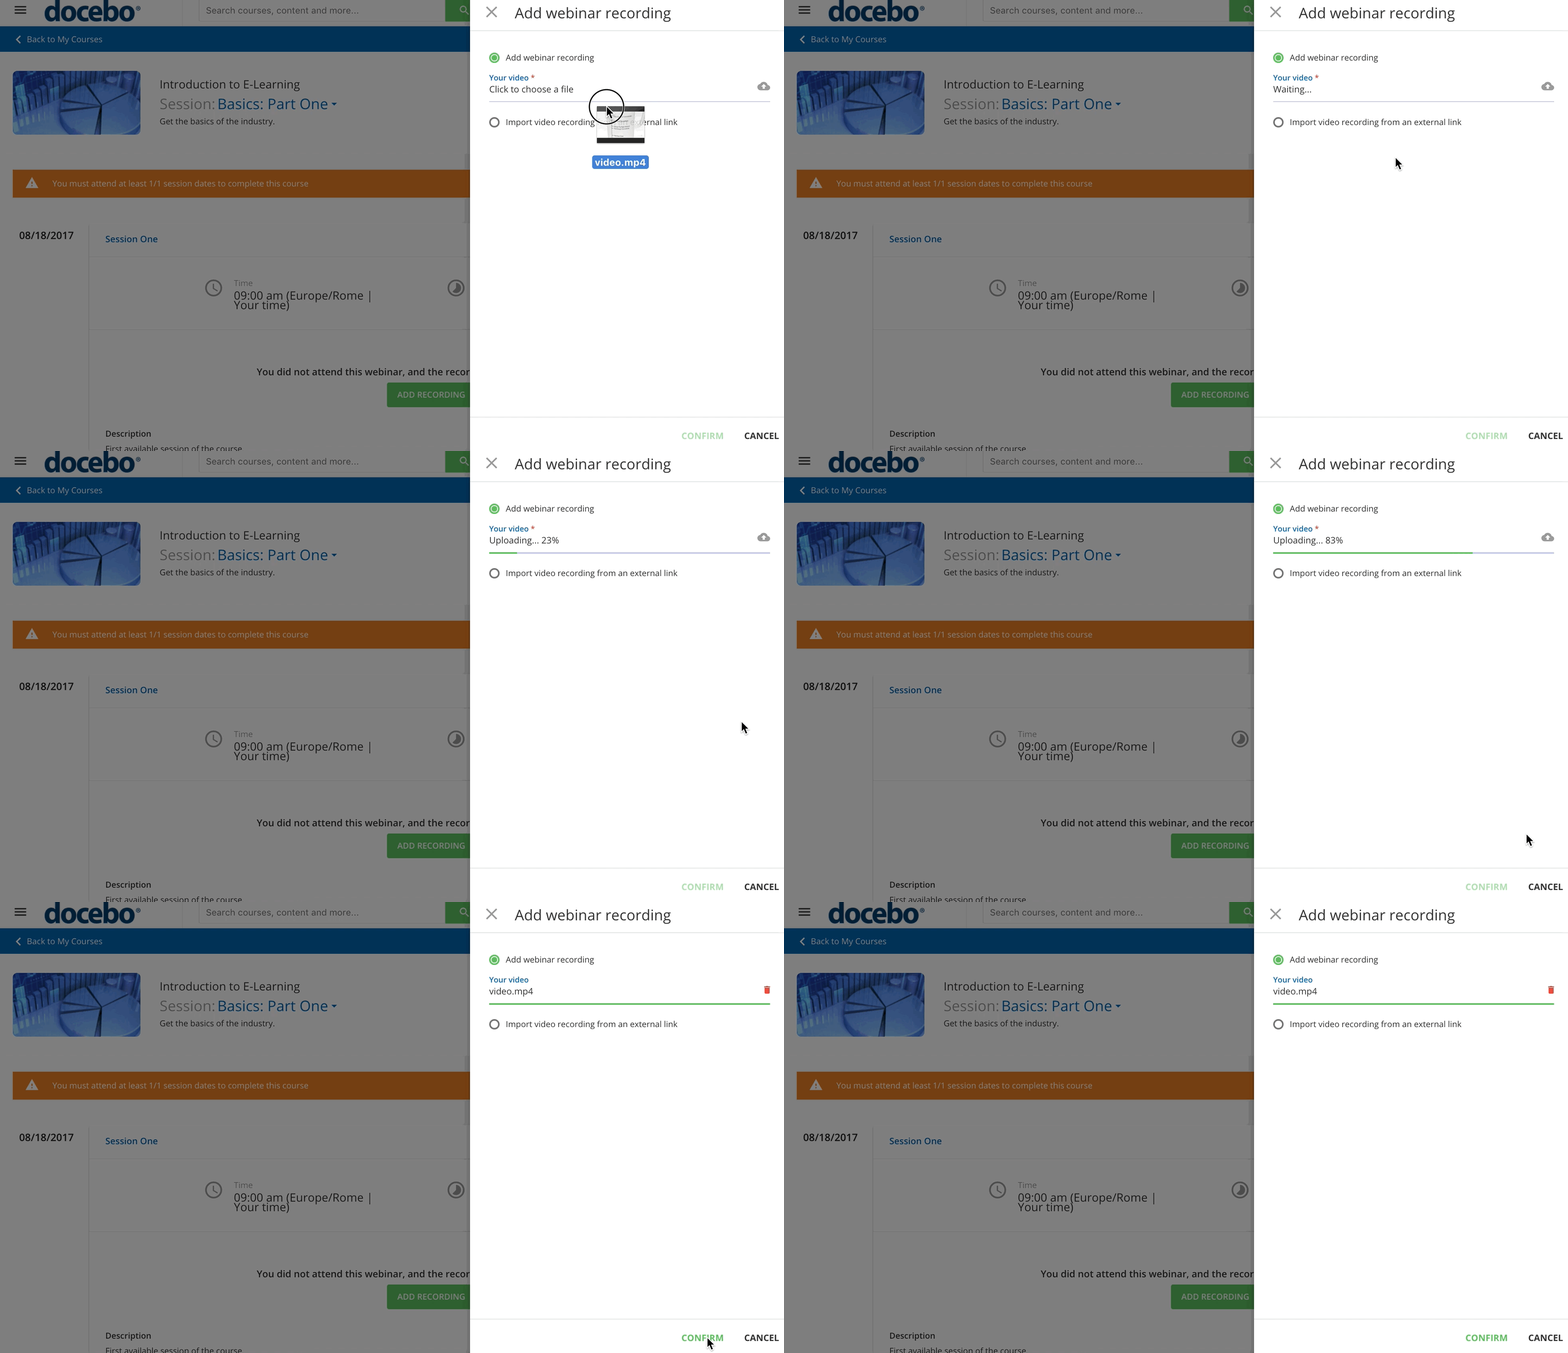
Instructors can add recordings of webinars into webinar sessions. There are three options to do so: add the recording via API, upload a video file, or share a link to a video. To add a webinar recording, access the course’s main page. Find the session in the list for which you would like to upload a recorded webinar session, then press the arrow icon in the session’s section.
Press the Add Recording button at the bottom. In the slideout panel, flag whether you want to add the recording by uploading a video file or by linking to a video URL. When the video upload is over, press the Confirm button. Please note that the time it takes to import and convert the video depends on its size.
When the video is ready, a message will inform you that it was successfully converted, and the Add Recording button is replaced with the View Recording button. To delete the recording, press the red X next to this button.
You can upload one recording per webinar session, the maximum recording file size is 800MB.
Was this article helpful?
That’s Great!
Thank you for your feedback
Sorry! We couldn't be helpful
Thank you for your feedback
Feedback sent
We appreciate your effort and will try to fix the article

