Importing Users via CSV
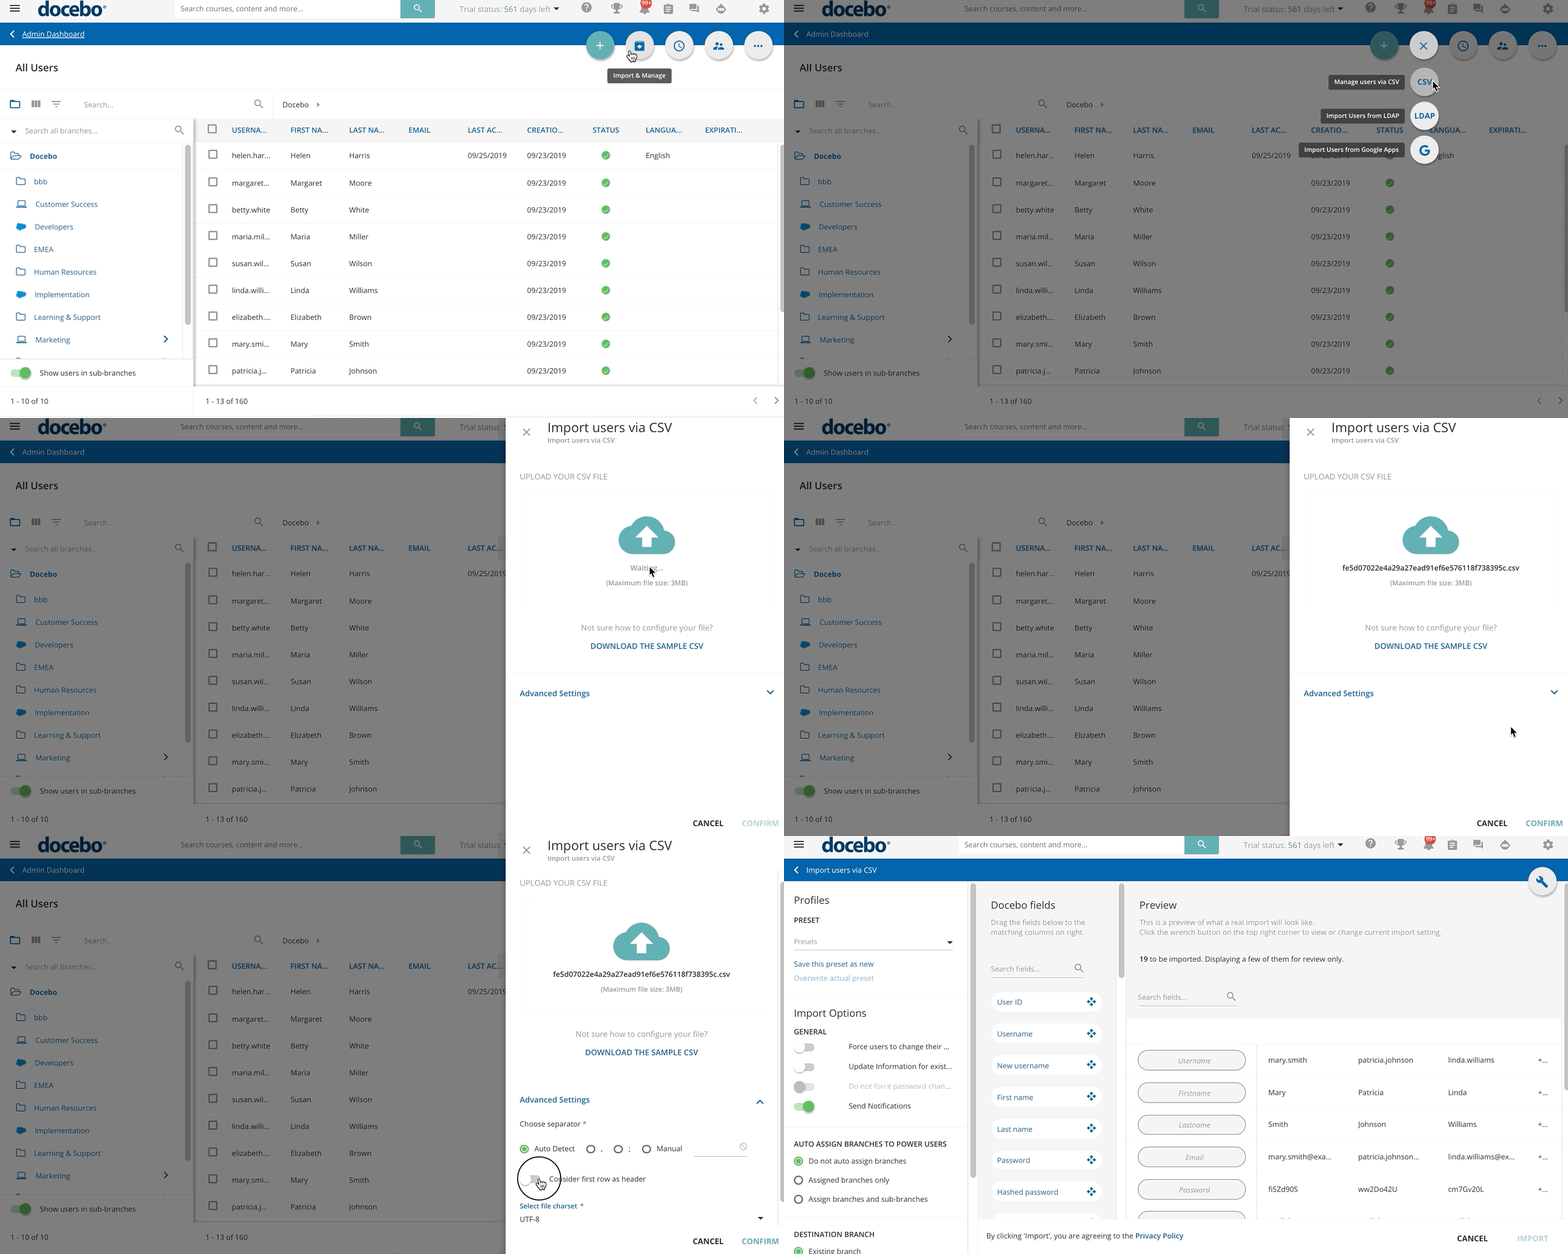
For a successful upload, it is important to create a CSV file properly formatted. In order to view a correct example, select the Download a Sample CSV File item in the slideout panel. Please note that dates are formatted as YYYY-MM-DD, but your spreadsheet may display them differently, depending on the program you used to open the CSV sample.
Once your file is ready, you can drag and drop it into the upload section of the slideout panel, or press the Browse button to find the file.
The maximum file size of a CSV file that you’re able to import into your platform for a user upload is 3MB.
Once uploaded, press the Advanced Settings title to view the additional settings. The system is configured to automatically detect the Field Separator, which is needed in order to organize the information by columns. Information can be additionally organized by a comma, a semicolon, or manually, depending on your needs.
Then, flag the option that the first row is considered a Header (only if this fits your CSV file format), and select the File Charset from the dropdown menu. As for the File Charset, we recommend UTF-8, which is standard. Please remember to use quotation marks to delimit the text content. Press Confirm to upload your .csv file.
The system will then process your CSV file. Once ready, you will be redirected to the import page. In the left panel, inside the Import Options section, configure the following options:
Profiles
In the Preset section, you can select a preset from the dropdown menu to associate a previous mapping configuration to this CSV import. Presets are associated with the user you are using to perform the import action. Also, the list of saved presets is visible in other parts of the platform such as user enrollments into courses via CSV.
Press the Overwrite Actual Preset button to complete this action. Additionally, you can map the columns to platform fields (see more below), then save the configuration by pressing the Save this Preset as New button. In the pop-up box, provide a name for the preset, then press Save.
Please Note: once created, a preset cannot be deleted, but you can overwrite the preset if you wish.
General Import Options
This section gathers several parameters concerning the import procedure:
- Force users to change their password at their first login. When this option is activated, users will immediately be asked to change their password after the initial login to the platform. Please note that if you have not enabled this option, you can still force your users to change their passwords upon their first sign into the platform by creating a corresponding column in your CSV file and matching it to the Force Password Change field.
- Do not force password change for existing users. When this option is flagged, any existing users in the platform that also exist in the newly-imported CSV file will not have to update their passwords like new users (if the Change password at first sign in option is also activated).
- Send Notifications. When this option is activated, all users being imported into the platform will receive a welcome email once the import is complete. If this option is not activated, the users will not receive an email upon being imported, but you can send it later from the User Management page in your platform. Remember that the User has been created (by administrator) notification will be not sent if not configured by you as the Superadmin in the Notification App.
- Create new branches when the fields “branch name path” and “branch code path” are both mapped and the field value (branch) does not exist in the platform. When this option is flagged, and both the branch name path and the branch code path are mapped in the CSV file, a new branch is created in the platform, according to the name and the path defined in the file.
Notes on General Import Options
Both the Force users to change their password at their first login option and the Do not force password change for existing users option force users to change their passwords, but the former only affects the password change for newly created users, while the latter only affects existing users.
Update Users
This option allows you to configure how the information of existing users will be updated upon importing the CSV file. When this option is flagged, the imported information for users already existing in the platform will overwrite any existing user information if the user branch remains unchanged.
If the branch specified in the CSV file is different from the one currently assigned to users, and your platform has been activated before October 21, 2019, you can decide whether to copy or move the users involved in the update to the newly assigned branch. If your platform has been activated after October 21, 2019, when updating data for existing users, users will be moved by default to the new destination branch, you will not have the option to copy them to different branches. This means that it is not possible for a user to be placed in more than one branch.
- Add users to the related branch. When users are copied to another branch, they are available in more branches. This section is visible only if your platform was activated before October 21, 2019. In this way, the users in the file will be in multiple branches.
- Move users to the related branch. When users are moved from one branch to another, they are no longer available in the source branch; if they are assigned to multiple branches, they will be deleted from all the branches and moved to the new branch. In this way, the users in the file will only be in one branch.
Please Note: In order to be compliant with regulations (e.g. GDPR) that might require to anonymize the accounts of the people that left the company, we suggest changing the Username, Name, Surname, and email, using instead a code, so that it will still be possible to have the complete statistics, without letting anyone know the user identity. These changes can be done through a CSV update or via APIs (Batch import users).
Update Profiles
Use this option to configure if the profiles assigned to existing Power Users will be updated upon importing the CSV file. When this option is flagged, the imported Power User profile assignments will overwrite any existing profile assignment defined in the platform.
Destination Fallback Branch
This section is used for the configuration of an “emergency” destination branch to be used when the destination branch field is not mapped in the Preview area, or when it is mapped, but its value is empty. Select whether to:
- Do Nothing. When this option is selected, and the CSV file includes users to be updated, user information will not be updated, users will remain unchanged. If the CSV file includes new users, they will be created in the Docebo root folder.
- Use existing branch. When this option is selected, updated users will be moved to one of the existing branches, selectable from the dropdown menu.
Auto-assign branches to Power Users
From this area, you can configure whether to directly associate the Power Users created with the CSV file to the branch (and sub-branches) they manage by creating a simple branch association or an association between the branches and their descendants.
- Do not auto assign branches. When this option is selected, Power Users will not be automatically associated with branches, and you will have to activate the association manually.
- Assigned branches only. When this option is selected, Power Users will manage the branch into which they have been placed during the creation process.
- Assign branches and sub-branches. When this option is selected, Power Users will manage the branch into which they have been placed during the creation process as well as any descendants of that branch.
If you choose the option Assigned branches only or Assign branches and sub-branches, in order for users to automatically be assigned to a Power User on the Assign Users page (that you reach by clicking on the user's icon in the Power User's row on the Power Users management page) the following conditions must be true:
- The CSV file must contain (at a minimum): Username, Profile Name, Level, Branch Code or Branch Name or both Branch Name Path and Branch Code Path
- If the Power User already exists in the system, the option to Update Information for existing users must be selected under the Update Users section
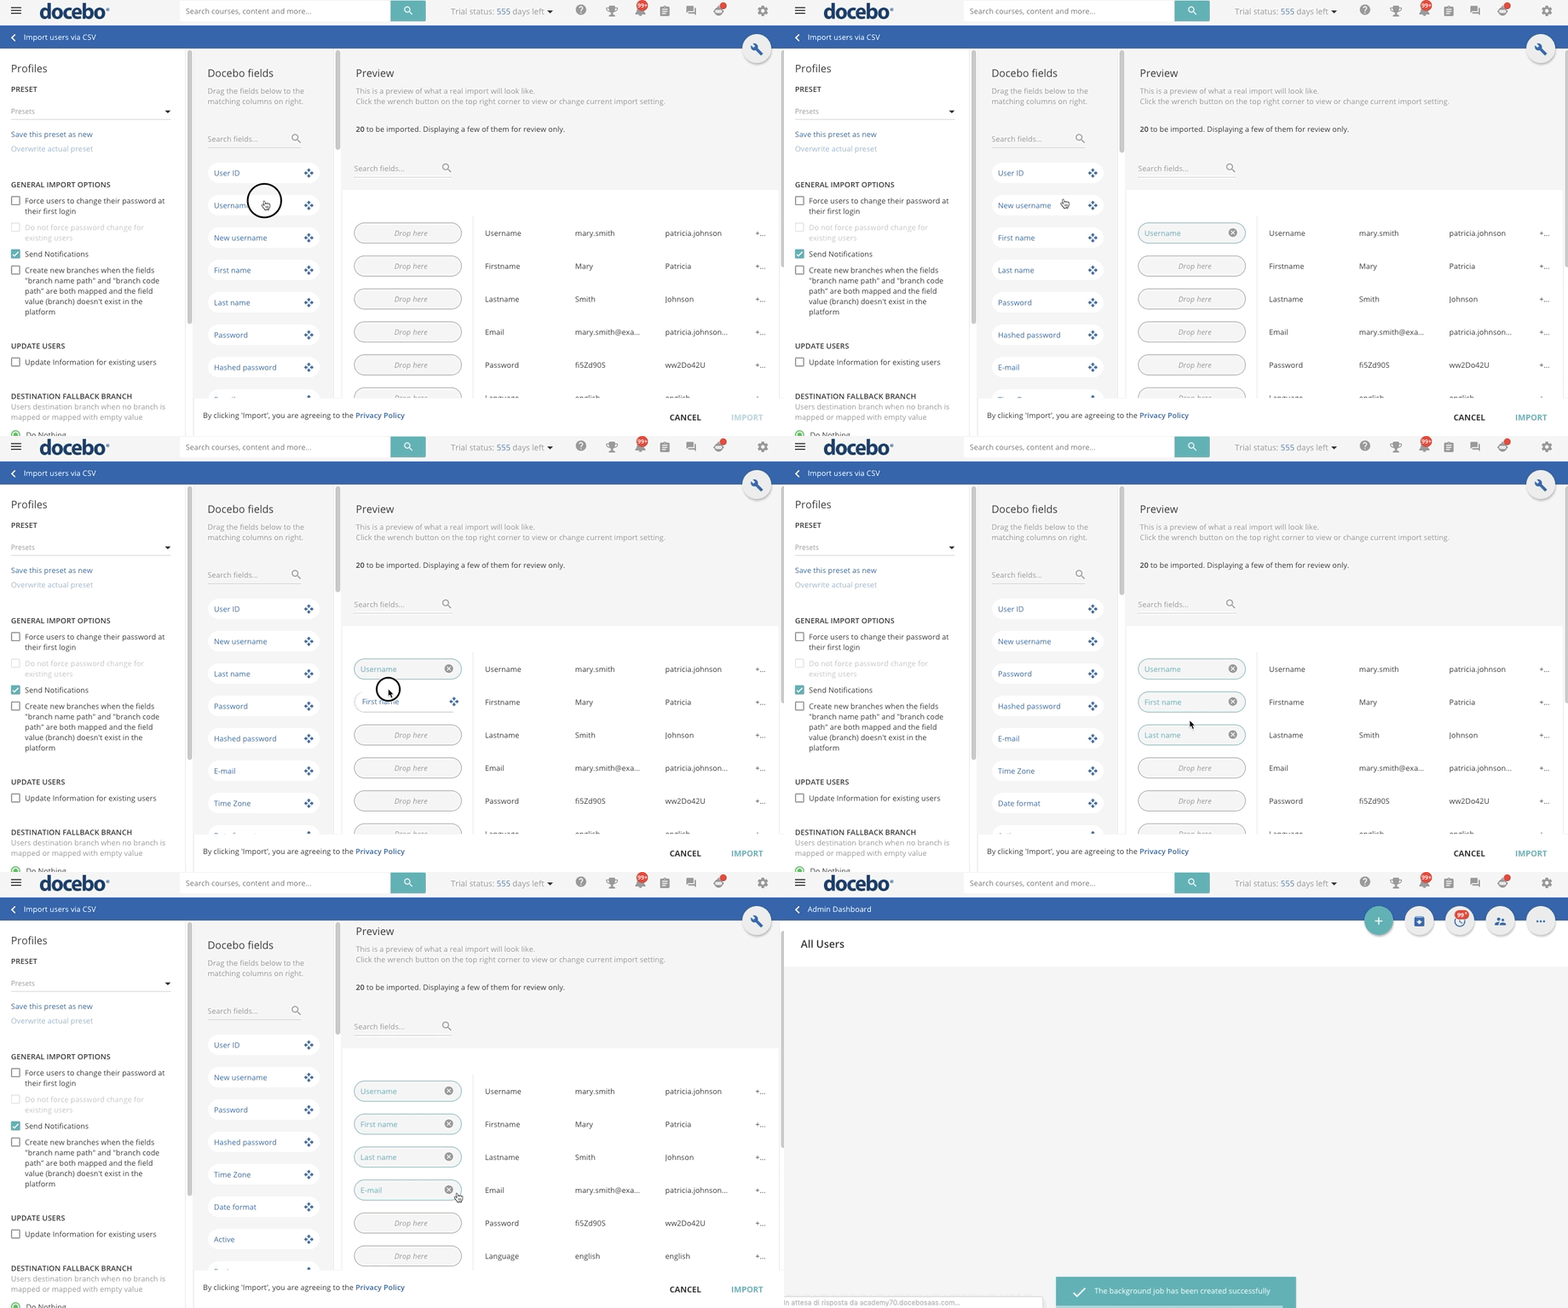
The Preview section will display a preview of the CSV file as read by the system. Drag and drop the fields in the Docebo Fields section on the left to match the fields with the column names of your CSV file.
Please Note: The correct format for the Date Format field is YYYY-MM-DD. The following fields aren't case sensitive when completing a CSV import of users: User status, User level, Language, Country, Timezone, Yes/No additional field.
Once you’ve matched the fields for all of your columns, review all of the info on the import page, then press the Import button at the bottom of the page. Confirm the information in the pop-up message that appears, then press Import Users.
The import job happens in the background. In case of any errors, an error file will be made available for download. To find this file, access the Admin Menu, then select the Background Jobs item. Find the job in the list to download the file.
All users that were imported into the platform will appear in the list of users on the User Management page, where you can edit their profile or delete them from the platform as necessary.
Was this article helpful?
That’s Great!
Thank you for your feedback
Sorry! We couldn't be helpful
Thank you for your feedback
Feedback sent
We appreciate your effort and will try to fix the article


